A directed acyclic graph (DAG) can be used to represent a set of computations where the input, output, or execution of one or more computations is dependent on one or more other computations. The computations are nodes (vertices) in the graph, and the edges (arcs) identify the dependencies. HTCondor finds machines for the execution of programs, but it does not schedule programs based on dependencies. The Directed Acyclic Graph Manager (DAGMan) is a meta-scheduler for the execution of programs (computations). DAGMan submits the programs to HTCondor in an order represented by a DAG and processes the results. A DAG input file describes the DAG.
DAGMan is itself executed as a scheduler universe job within HTCondor. It submits the HTCondor jobs within nodes in such a way as to enforce the DAG's dependencies. DAGMan also handles recovery and reporting on the HTCondor jobs.
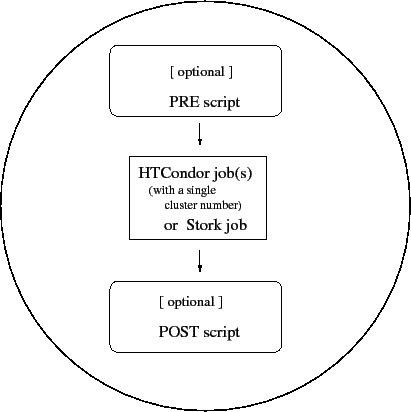
A node within a DAG may encompass more than a single program submitted to run under HTCondor. Figure 2.1 illustrates the elements of a node.
More than one HTCondor job may belong to a single node. All HTCondor jobs within a node must be within a single cluster, as given by the job ClassAd attribute ClusterId.
DAGMan enforces the dependencies within a DAG using the events recorded in a separate file that is specified by the default configuration. If the exact same DAG were to be submitted more than once, such that these DAGs were running at the same time, expected them to fail in unpredictable and unexpected ways. They would all be using the same single file to enforce dependencies.
As DAGMan schedules and submits jobs within nodes to HTCondor, these jobs are defined to succeed or fail based on their return values. This success or failure is propagated in well-defined ways to the level of a node within a DAG. Further progression of computation (towards completing the DAG) is based upon the success or failure of nodes.
The failure of a single job within a cluster of multiple jobs (within a single node) causes the entire cluster of jobs to fail. Any other jobs within the failed cluster of jobs are immediately removed. Each node within a DAG may be further constrained to succeed or fail based upon the return values of a PRE script and/or a POST script.
The input file used by DAGMan is called a DAG input file. It specifies the nodes of the DAG as well as the dependencies that order the DAG. All items are optional, except that there must be at least one JOB item.
Comments may be placed in the DAG input file.
The pound character (#) as the first character on a
line identifies the line as a comment.
Comments do not span lines.
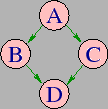
A simple diamond-shaped DAG, as shown in Figure 2.2 is presented as a starting point for examples. This DAG contains 4 nodes.
A very simple DAG input file for this diamond-shaped DAG is
    # File name: diamond.dag
    #
    JOB  A  A.condor
    JOB  B  B.condor
    JOB  C  C.condor
    JOB  D  D.condor
    PARENT A CHILD B C
    PARENT B C CHILD D
A set of basic commands appearing in a DAG input file is described below.
The JOB command specifies an HTCondor job. The syntax used for each JOB command is
JOB JobName SubmitDescriptionFileName [DIR directory] [NOOP] [DONE]
A JOB entry maps a JobName to an HTCondor submit description file. The JobName uniquely identifies nodes within the DAG input file and in output messages. Each node name, given by JobName, within the DAG must be unique. The JOB entry must appear within the DAG input file before other items that reference the node.
The keywords JOB, DIR, NOOP, and DONE are not case sensitive. Therefore, DONE, Done, and done are all equivalent. The values defined for JobName and SubmitDescriptionFileName are case sensitive, as file names in a file system are case sensitive. The JobName can be any string that contains no white space, except for the strings PARENT and CHILD (in upper, lower, or mixed case). JobName also cannot contain special characters ('.', '+') which are reserved for system use.
Note that DIR, NOOP, and DONE, if used, must appear in the order shown above.
The optional DIR keyword specifies a working directory for this node, from which the HTCondor job will be submitted, and from which a PRE and/or POST script will be run. If a relative directory is specified, it is relative to the current working directory as the DAG is submitted. Note that a DAG containing DIR specifications cannot be run in conjunction with the -usedagdir command-line argument to condor_submit_dag. A "full" rescue DAG generated by a DAG run with the -usedagdir argument will contain DIR specifications, so such a rescue DAG must be run without the -usedagdir argument. (Note that "full" rescue DAGs are no longer the default.)
The optional NOOP keyword identifies that the HTCondor job within the node is not to be submitted to HTCondor. This optimization is useful in cases such as debugging a complex DAG structure, where some of the individual jobs are long-running. For this debugging of structure, some jobs are marked as NOOPs, and the DAG is initially run to verify that the control flow through the DAG is correct. The NOOP keywords are then removed before submitting the DAG. Any PRE and POST scripts for jobs specified with NOOP are executed; to avoid running the PRE and POST scripts, comment them out. The job that is not submitted to HTCondor is given a return value that indicates success, such that the node may also succeed. Return values of any PRE and POST scripts may still cause the node to fail. Even though the job specified with NOOP is not submitted, its submit description file must exist; the log file for the job is used, because DAGMan generates dummy submission and termination events for the job.
The optional DONE keyword identifies a node as being already completed. This is mainly used by Rescue DAGs generated by DAGMan itself, in the event of a failure to complete the workflow. Nodes with the DONE keyword are not executed when the Rescue DAG is run, allowing the workflow to pick up from the previous endpoint. Users should generally not use the DONE keyword. The NOOP keyword is more flexible in avoiding the execution of a job within a node. Note that, for any node marked DONE in a DAG, all of its parents must also be marked DONE; otherwise, a fatal error will result. The DONE keyword applies to the entire node. A node marked with DONE will not have a PRE or POST script run, and the HTCondor job will not be submitted.
As of version 8.3.5, condor_dagman no longer supports DATA nodes.
The PARENT CHILD command specifies the dependencies within the DAG. Nodes are parents and/or children within the DAG. A parent node must be completed successfully before any of its children may be started. A child node may only be started once all its parents have successfully completed.
The syntax used for each dependency (PARENT/CHILD) command is
PARENT ParentJobName... CHILD ChildJobName...
The PARENT keyword is followed by one or more ParentJobNames. The CHILD keyword is followed by one or more ChildJobNames. Each child job depends on every parent job within the line. A single line in the input file can specify the dependencies from one or more parents to one or more children. The diamond-shaped DAG example may specify the dependencies with
PARENT A CHILD B C
PARENT B C CHILD D
An alternative specification for the diamond-shaped DAG may specify some or all of the dependencies on separate lines:
PARENT A CHILD B C
PARENT B CHILD D
PARENT C CHILD D
As a further example, the line
PARENT p1 p2 CHILD c1 c2produces four dependencies:
p1 to c1
p1 to c2
p2 to c1
p2 to c2
The optional SCRIPT command specifies processing that is done either before a job within a node is submitted or after a job within a node completes its execution. Processing done before a job is submitted is called a PRE script. Processing done after a job completes its execution is called a POST script. Note that the executable specified does not necessarily have to be a shell script (Unix) or batch file (Windows); but it should be relatively light weight because it will be run directly on the submit machine, not submitted as an HTCondor job.
The syntax used for each PRE or POST command is
SCRIPT [DEFER status time] PRE JobName|ALL_NODES ExecutableName [arguments]
SCRIPT [DEFER status time] POST JobName|ALL_NODES ExecutableName [arguments]
The SCRIPT command uses the PRE or POST keyword, which specifies the relative timing of when the script is to be run. The JobName identifies the node to which the script is attached. The ExecutableName specifies the executable (e.g., shell script or batch file) to be executed, and may not contain spaces. The optional arguments are command line arguments to the script, and spaces delimit the arguments. Both ExecutableName and optional arguments are case sensitive.
Scripts are executed on the submit machine; the submit machine is not necessarily the same machine upon which the node's job is run. Further, a single cluster of HTCondor jobs may be spread across several machines.
The optional DEFER feature causes a retry of only the script, if the execution of the script exits with the exit code given by status. The retry occurs after at least time seconds, rather than being considered failed. While waiting for the retry, the script does not count against a maxpre or maxpost limit. The ordering of the DEFER feature within the SCRIPT specification is fixed. It must come directly after the SCRIPT keyword; this is done to avoid backward compatibility issues for any DAG with a JobName of DEFER.
A PRE script is commonly used to place files in a staging area for the jobs to use. A POST script is commonly used to clean up or remove files once jobs are finished running. An example uses PRE and POST scripts to stage files that are stored on tape. The PRE script reads compressed input files from the tape drive, uncompresses them, and places the resulting files in the current directory. The HTCondor jobs can then use these files, producing output files. The POST script compresses the output files, writes them out to the tape, and then removes both the staged files and the output files.
If the PRE script fails, then the HTCondor job associated with the node is not submitted, and (as of version 8.5.4) the POST script is not run either (by default). However, if the job is submitted, and there is a POST script, the POST script is always run once the job finishes. (The behavior when the PRE script fails may may be changed to run the POST script by setting configuration variable DAGMAN_ALWAYS_RUN_POST to True or by passing the -AlwaysRunPost argument to condor_submit_dag.)
Progress towards completion of the DAG is based upon the success of the nodes within the DAG. The success of a node is based upon the success of the job(s), PRE script, and POST script. A job, PRE script, or POST script with an exit value not equal to 0 is considered failed. The exit value of whatever component of the node was run last determines the success or failure of the node. Table 2.1 lists the definition of node success and failure for all variations of script and job success and failure, when DAGMAN_ALWAYS_RUN_POST is set to False. In this table, a dash (-) represents the case where a script does not exist for the DAG, S represents success, and F represents failure.
Table 2.2 lists the definition of node success and failure only for the cases where the PRE script fails, when DAGMAN_ALWAYS_RUN_POST is set to True.
|
|
Special script argument macros
The five macros $JOB, $RETRY, $MAX_RETRIES, $DAG_STATUS and $FAILED_COUNT can be used within the DAG input file as arguments passed to a PRE or POST script. The three macros $JOBID, $RETURN, and $PRE_SCRIPT_RETURN can be used as arguments to POST scripts. The use of these variables is limited to being used as an individual command line argument to the script, surrounded by spaces, in order to cause the substitution of the variable's value.
The special macros are as follows:
A job that dies due to a signal is reported with a $RETURN value representing the additive inverse of the signal number. For example, SIGKILL (signal 9) is reported as -9. A job whose batch system submission fails is reported as -1001. A job that is externally removed from the batch system queue (by something other than condor_dagman) is reported as -1002.
Examples that use PRE or POST scripts
Examples use the diamond-shaped DAG. A first example uses a PRE script to expand a compressed file needed as input to each of the HTCondor jobs of nodes B and C. The DAG input file:
    # File name: diamond.dag
    #
    JOB  A  A.condor
    JOB  B  B.condor
    JOB  C  C.condor
    JOB  D  D.condor
    SCRIPT PRE  B  pre.csh $JOB .gz
    SCRIPT PRE  C  pre.csh $JOB .gz
    PARENT A CHILD B C
    PARENT B C CHILD D
The script pre.csh uses its command line arguments to form the file name of the compressed file. The script contains
  #!/bin/csh
  gunzip $argv[1]$argv[2]
Therefore, the PRE script invokes
gunzip B.gzfor node B, which uncompresses file B.gz, placing the result in file B.
A second example uses the $RETURN macro. The DAG input file contains the POST script specification:
SCRIPT POST A stage-out job_status $RETURNIf the HTCondor job of node A exits with the value -1, the POST script is invoked as
stage-out job_status -1
The slightly different example POST script specification in the DAG input file
SCRIPT POST A stage-out job_status=$RETURNinvokes the POST script with
stage-out job_status=$RETURN
This example shows that when there is no space between the = sign and the variable $RETURN, there is no substitution of the macro's value.
The behavior of DAGMan with respect to node success or failure can be changed with the addition of a PRE_SKIP command. A PRE_SKIP line within the DAG input file uses the syntax:
PRE_SKIP JobName|ALL_NODES non-zero-exit-code
The PRE script of a node identified by JobName that exits with the value given by non-zero-exit-code skips the remainder of the node entirely. Neither the job associated with the node nor the POST script will be executed, and the node will be marked as successful.
As of version 8.5.6, commands referencing a JobName can come before the JOB command defining that JobName.
For example, the command sequence
SCRIPT PRE NodeA foo.pl
VARS NodeA state="Wisconsin"
JOB NodeA bar.sub
is now legal (it would have been illegal in 8.5.5 and all previous versions).
Each node in a DAG may use a unique submit description file. A key limitation is that each HTCondor submit description file must submit jobs described by a single cluster number; DAGMan cannot deal with a submit description file producing multiple job clusters.
Consider again the diamond-shaped DAG example, where each node job uses the same submit description file.
    # File name: diamond.dag
    #
    JOB  A  diamond_job.condor
    JOB  B  diamond_job.condor
    JOB  C  diamond_job.condor
    JOB  D  diamond_job.condor
    PARENT A CHILD B C
    PARENT B C CHILD D
Here is a sample HTCondor submit description file for this DAG:
    # File name: diamond_job.condor
    #
    executable   = /path/diamond.exe
    output       = diamond.out.$(cluster)
    error        = diamond.err.$(cluster)
    log          = diamond_condor.log
    universe     = vanilla
    queue
Since each node uses the same HTCondor submit description file, this implies that each node within the DAG runs the same job. The $(Cluster) macro produces unique file names for each job's output.
The job ClassAd attribute DAGParentNodeNames is also available for use within the submit description file. It defines a comma separated list of each JobName which is a parent node of this job's node. This attribute may be used in the arguments command for all but scheduler universe jobs. For example, if the job has two parents, with JobNames B and C, the submit description file command
arguments = $$([DAGParentNodeNames])will pass the string "B,C" as the command line argument when invoking the job.
DAGMan supports jobs with queues of multiple procs, so for example:
queue 500will queue 500 procs as expected.
Additionally, as of version 8.7.4 DAGMan supports late materialization. To use this functionality, set both SCHEDD_ALLOW_LATE_MATERIALIZATION and SUBMIT_FACTORY_JOBS_BY_DEFAULT knobs in your HTCondor configuration to True. This will have the side effect of submitting all jobs as factory jobs (not just the ones you explicitly flag) so use this sparingly.
A DAG is submitted using the tool condor_submit_dag.
The manual
page ![[*]](crossref.png) details the command.
The simplest of DAG submissions has the syntax
details the command.
The simplest of DAG submissions has the syntax
condor_submit_dag DAGInputFileName
and the current working directory contains the DAG input file.
The diamond-shaped DAG example may be submitted with
condor_submit_dag diamond.dag
Do not submit the same DAG, with same DAG input file, from within the same directory, such that more than one of this same DAG is running at the same time. It will fail in an unpredictable manner, as each instance of this same DAG will attempt to use the same file to enforce dependencies.
To increase robustness and guarantee recoverability, the condor_dagman process is run as an HTCondor job. As such, it needs a submit description file. condor_submit_dag generates this needed submit description file, naming it by appending .condor.sub to the name of the DAG input file. This submit description file may be edited if the DAG is submitted with
condor_submit_dag -no_submit diamond.dagcausing condor_submit_dag to create the submit description file, but not submit condor_dagman to HTCondor. To submit the DAG, once the submit description file is edited, use
condor_submit diamond.dag.condor.sub
Submit machines with limited resources are supported by command line options that place limits on the submission and handling of HTCondor jobs and PRE and POST scripts. Presented here are descriptions of the command line options to condor_submit_dag. These same limits can be set in configuration. Each limit is applied within a single DAG.
Total nodes/clusters: The -maxjobs option specifies the maximum number of clusters that condor_dagman can submit at one time. Since each node corresponds to a single cluster, this limit restricts the number of nodes that can be submitted (in the HTCondor queue) at a time. It is commonly used when there is a limited amount of input file staging capacity. As a specific example, consider a case where each node represents a single HTCondor proc that requires 4 MB of input files, and the proc will run in a directory with a volume of 100 MB of free space. Using the argument -maxjobs 25 guarantees that a maximum of 25 clusters, using a maximum of 100 MB of space, will be submitted to HTCondor at one time. (See the condor_submit_dag man page ( 12) for more information. Also see the equivalent DAGMAN_MAX_JOBS_SUBMITTED configuration option ( 3.5.23).)
Idle procs: The number of idle procs within a given DAG can be limited with the optional command line argument -maxidle. condor_dagman will not submit any more node jobs until the number of idle procs in the DAG goes below this specified value, even if there are ready nodes in the DAG. This allows condor_dagman to submit jobs in a way that adapts to the load on the HTCondor pool at any given time. If the pool is lightly loaded, condor_dagman will end up submitting more jobs; if the pool is heavily loaded, condor_dagman will submit fewer jobs. (See the condor_submit_dag man page ( 12) for more information. Also see the equivalent DAGMAN_MAX_JOBS_IDLE configuration option ( 3.5.23).)
Note that the -maxjobs option applies to counts of clusters, whereas the -maxidle option applies to counts of procs. Unfortunately, this can be a bit confusing. Of course, if none of your submit files create more than one proc, the distinction doesn't matter. For example, though, a node job submit file that queues 5 procs will count as one for -maxjobs, but five for -maxidle (if all of the procs are idle).
Subsets of nodes: Node submission can also be throttled in a finer-grained manner by grouping nodes into categories. See section 2.10.9 for more details.
PRE/POST scripts: Since PRE and POST scripts run on the submit machine, it may be desirable to limit the number of PRE or POST scripts running at one time. The optional -maxpre command line argument limits the number of PRE scripts that may be running at one time, and the optional -maxpost command line argument limits the number of POST scripts that may be running at one time. (See the condor_submit_dag man page ( 12) for more information. Also see the equivalent DAGMAN_MAX_PRE_SCRIPTS ( 3.5.23) and DAGMAN_MAX_POST_SCRIPTS ( 3.5.23) configuration options.)
condor_dagman assumes that all relative paths in a DAG input file and the associated HTCondor submit description files are relative to the current working directory when condor_submit_dag is run. This works well for submitting a single DAG. It presents problems when multiple independent DAGs are submitted with a single invocation of condor_submit_dag. Each of these independent DAGs would logically be in its own directory, such that it could be run or tested independent of other DAGs. Thus, all references to files will be designed to be relative to the DAG's own directory.
Consider an example DAG within a directory named dag1. There would be a DAG input file, named one.dag for this example. Assume the contents of this DAG input file specify a node job with
JOB A A.submitFurther assume that partial contents of submit description file A.submit specify
  executable = programA
  input      = A.input
Directory contents are
    dag1 (directory)
          one.dag
          A.submit
          programA
          A.input
All file paths are correct relative to the dag1 directory. Submission of this example DAG sets the current working directory to dag1 and invokes condor_submit_dag:
  cd dag1
  condor_submit_dag one.dag
Expand this example such that there are now two independent DAGs, and each is contained within its own directory. For simplicity, assume that the DAG in dag2 has remarkably similar files and file naming as the DAG in dag1. Assume that the directory contents are
    parent (directory)
         dag1 (directory)
               one.dag
               A.submit
               programA
               A.input
         dag2 (directory)
               two.dag
               B.submit
               programB
               B.input
The goal is to use a single invocation of condor_submit_dag to run both dag1 and dag2. The invocation
  cd parent
  condor_submit_dag dag1/one.dag dag2/two.dag
does not work. Path names are now relative to parent, which is not the desired behavior.
The solution is the -usedagdir command line argument to condor_submit_dag. This feature runs each DAG as if condor_submit_dag had been run in the directory in which the relevant DAG file exists. A working invocation is
  cd parent
  condor_submit_dag -usedagdir dag1/one.dag dag2/two.dag
Output files will be placed in the correct directory, and the .dagman.out file will also be in the correct directory. A Rescue DAG file will be written to the current working directory, which is the directory when condor_submit_dag is invoked. The Rescue DAG should be run from that same current working directory. The Rescue DAG includes all the path information necessary to run each node job in the proper directory.
Use of -usedagdir does not work in conjunction with a JOB node specification within the DAG input file using the DIR keyword. Using both will be detected and generate an error.
After submission, the progress of the DAG can be monitored by looking at the job event log file(s) or observing the e-mail that job submission to HTCondor causes, or by using condor_q -dag.
Detailed information about a DAG's job progress can be obtained using condor_q -l <jobID>. This information is not updated frequently, however, so expect to see stale data. You can increase the frequency of updates by setting the DAGMAN_QUEUE_UPDATE_INTERVAL configuration macro to a lower number, ie. 5 or 10 seconds. Doing so will increase the workload on the condor_schedd, so be cautious about setting it too low.
There is also a large amount of information logged in an extra file. The name of this extra file is produced by appending .dagman.out to the name of the DAG input file; for example, if the DAG input file is diamond.dag, this extra file is named diamond.dag.dagman.out. If this extra file grows too large, limit its size with the configuration variable MAX_DAGMAN_LOG, as defined in section 3.5.2. The dagman.out file is an important resource for debugging; save this file if a problem occurs. The dagman.out is appended to, rather than overwritten, with each new DAGMan run.
To remove an entire DAG, consisting of the condor_dagman job, plus any jobs submitted to HTCondor, remove the condor_dagman job by running condor_rm. For example,
% condor_q
-- Submitter: turunmaa.cs.wisc.edu : <128.105.175.125:36165> : turunmaa.cs.wisc.edu
 ID      OWNER          SUBMITTED     RUN_TIME ST PRI SIZE CMD
  9.0   taylor         10/12 11:47   0+00:01:32 R  0   8.7  condor_dagman -f -
 11.0   taylor         10/12 11:48   0+00:00:00 I  0   3.6  B.out
 12.0   taylor         10/12 11:48   0+00:00:00 I  0   3.6  C.out

    3 jobs; 2 idle, 1 running, 0 held

% condor_rm 9.0
When a condor_dagman job is removed, all node jobs (including sub-DAGs) of that condor_dagman will be removed by the condor_schedd. As of version 8.5.8, the default is that condor_dagman itself also removes the node jobs (to fix a race condition that could result in "orphaned" node jobs). (The condor_schedd has to remove the node jobs to deal with the case of removing a condor_dagman job that has been held.)
The previous behavior of condor_dagman itself not removing the node jobs can be restored by setting the DAGMAN_REMOVE_NODE_JOBS configuration macro (see 3.5.23) to False. This will decrease the load on the condor_schedd, at the cost of allowing the possibility of "orphaned" node jobs.
A removed DAG will be considered failed unless the DAG has a FINAL node that succeeds.
In the case where a machine is scheduled to go down, DAGMan will clean up memory and exit. However, it will leave any submitted jobs in the HTCondor queue.
It may be desired to temporarily suspend a running DAG. For example, the load may be high on the submit machine, and therefore it is desired to prevent DAGMan from submitting any more jobs until the load goes down. There are two ways to suspend (and resume) a running DAG.
After placing the condor_dagman job on hold, no new node jobs will be submitted, and no PRE or POST scripts will be run. Any node jobs already in the HTCondor queue will continue undisturbed. Any running PRE or POST scripts will be killed. If the condor_dagman job is left on hold, it will remain in the HTCondor queue after all of the currently running node jobs are finished. To resume the DAG, use condor_release on the condor_dagman job.
Note that while the condor_dagman job is on hold, no updates will be made to the dagman.out file.
The second way of suspending a DAG uses the existence of a specially-named file to change the state of the DAG. When in this halted state, no PRE scripts will be run, and no node jobs will be submitted. Running node jobs will continue undisturbed. A halted DAG will still run POST scripts, and it will still update the dagman.out file. This differs from behavior of a DAG that is held. Furthermore, a halted DAG will not remain in the queue indefinitely; when all of the running node jobs have finished, DAGMan will create a Rescue DAG and exit.
To resume a halted DAG, remove the halt file.
The specially-named file must be placed in the same directory as the DAG input file. The naming is the same as the DAG input file concatenated with the string .halt. For example, if the DAG input file is test1.dag, then test1.dag.halt will be the required name of the halt file.
As any DAG is first submitted with condor_submit_dag, a check is made for a halt file. If one exists, it is removed.
Note that neither condor_hold nor a DAG halt is propagated to sub-DAGs. In other words, if you condor_hold or create a halt file for a DAG that has sub-DAGs, any sub-DAGs that are already in the queue will continue to submit node jobs.
A condor_hold or DAG halt does, however, apply to splices, because they are merged into the parent DAG and controlled by a single condor_dagman instance.
DAGMan can retry any failed node in a DAG by specifying the node in the DAG input file with the RETRY command. The use of retry is optional. The syntax for retry is
RETRY JobName|ALL_NODES NumberOfRetries [UNLESS-EXIT value]
where JobName identifies the node. NumberOfRetries is an integer number of times to retry the node after failure. The implied number of retries for any node is 0, the same as not having a retry line in the file. Retry is implemented on nodes, not parts of a node.
The diamond-shaped DAG example may be modified to retry node C:
    # File name: diamond.dag
    #
    JOB  A  A.condor
    JOB  B  B.condor
    JOB  C  C.condor
    JOB  D  D.condor
    PARENT A CHILD B C
    PARENT B C CHILD D
    Retry  C 3
If node C is marked as failed for any reason, then it is started over as a first retry. The node will be tried a second and third time, if it continues to fail. If the node is marked as successful, then further retries do not occur.
Retry of a node may be short circuited using the optional keyword UNLESS-EXIT, followed by an integer exit value. If the node exits with the specified integer exit value, then no further processing will be done on the node.
The macro $RETRY evaluates to an integer value, set to 0 first time a node is run, and is incremented each time for each time the node is retried. The macro $MAX_RETRIES is the value set for NumberOfRetries. These macros may be used as arguments passed to a PRE or POST script.
The ABORT-DAG-ON command provides a way to abort the entire DAG if a given node returns a specific exit code. The syntax for ABORT-DAG-ON is
ABORT-DAG-ON JobName|ALL_NODES AbortExitValue [RETURN DAGReturnValue]
If the return value of the node specified by JobName matches AbortExitValue, the DAG is immediately aborted. A DAG abort differs from a node failure, in that a DAG abort causes all nodes within the DAG to be stopped immediately. This includes removing the jobs in nodes that are currently running. A node failure differs, as it would allow the DAG to continue running, until no more progress can be made due to dependencies.
The behavior differs based on the existence of PRE and/or POST scripts. If a PRE script returns the AbortExitValue value, the DAG is immediately aborted. If the HTCondor job within a node returns the AbortExitValue value, the DAG is aborted if the node has no POST script. If the POST script returns the AbortExitValue value, the DAG is aborted.
An abort overrides node retries. If a node returns the abort exit value, the DAG is aborted, even if the node has retry specified.
When a DAG aborts, by default it exits with the node return value that caused the abort. This can be changed by using the optional RETURN keyword along with specifying the desired DAGReturnValue. The DAG abort return value can be used for DAGs within DAGs, allowing an inner DAG to cause an abort of an outer DAG.
A DAG return value other than 0, 1, or 2 will cause the condor_dagman job to stay in the queue after it exits and get retried, unless the on_exit_remove expression in the .condor.sub file is manually modified.
Adding ABORT-DAG-ON for node C in the diamond-shaped DAG
    # File name: diamond.dag
    #
    JOB  A  A.condor
    JOB  B  B.condor
    JOB  C  C.condor
    JOB  D  D.condor
    PARENT A CHILD B C
    PARENT B C CHILD D
    Retry  C 3
    ABORT-DAG-ON C 10 RETURN 1
causes the DAG to be aborted, if node C exits with a return value of 10. Any other currently running nodes, of which only node B is a possibility for this particular example, are stopped and removed. If this abort occurs, the return value for the DAG is 1.
Macros defined for DAG nodes can be used within the submit description file of the node job. The VARS command provides a method for defining a macro. Macros are defined on a per-node basis, using the syntax
VARS JobName|ALL_NODES macroname="string" [macroname="string"...]
The macro may be used within the submit description file of the relevant node. A macroname may contain alphanumeric characters (a-z, A-Z, and 0-9) and the underscore character. The space character delimits macros, such that there may be more than one macro defined on a single line. Multiple lines defining macros for the same node are permitted.
Correct syntax requires that the string must be
enclosed in double quotes.
To use a double quote mark within a string,
escape the double quote mark with the backslash character (\).
To add the backslash character itself, use two backslashes (\\).
A restriction is that the macroname itself cannot begin with the string queue, in any combination of upper or lower case letters.
Examples
If the DAG input file contains
    # File name: diamond.dag
    #
    JOB  A  A.submit
    JOB  B  B.submit
    JOB  C  C.submit
    JOB  D  D.submit
    VARS A state="Wisconsin"
    PARENT A CHILD B C
    PARENT B C CHILD D
then the submit description file A.submit may use
the macro state.
Consider this
submit description file A.submit:
    # file name: A.submit
    executable = A.exe
    log        = A.log
    arguments  = "$(state)"
    queue
The macro value expands to become a command-line argument in
the invocation of the job.
The job is invoked with
A.exe Wisconsin
The use of macros may allow a reduction in the number of distinct submit description files. A separate example shows this intended use of VARS. In the case where the submit description file for each node varies only in file naming, macros reduce the number of submit description files to one.
This example references a single submit description file for each of the nodes in the DAG input file, and it uses the VARS entry to name files used by each job.
The relevant portion of the DAG input file appears as
    JOB A theonefile.sub
    JOB B theonefile.sub
    JOB C theonefile.sub

    VARS A filename="A"
    VARS B filename="B"
    VARS C filename="C"
The submit description file appears as
    # submit description file called:  theonefile.sub
    executable   = progX
    output       = $(filename)
    error        = error.$(filename)
    log          = $(filename).log
    queue
For a DAG such as this one, but with thousands of nodes, the ability to write and maintain a single submit description file together with a single, yet more complex, DAG input file is worthwhile.
If a macro name for a specific node in a DAG is defined more than once, as it would be with the partial file contents
  JOB job1 job1.submit
  VARS job1 a="foo"
  VARS job1 a="bar"
a warning is written to the log, of the format
Warning: VAR <macroname> is already defined in job <JobName>
Discovered at file "<DAG input file name>", line <line number>
The behavior of DAGMan is such that all definitions for the macro exist, but only the last one defined is used as the variable's value. Using this example, if the job1.submit submit description file contains
arguments = "$(a)"then the argument will be bar.
The value defined for a macro may contain spaces and tabs. It is also possible to have double quote marks and backslashes within a value. In order to have spaces or tabs within a value specified for a command line argument, use the New Syntax format for the arguments submit command, as described in section 12. Escapes for double quote marks depend on whether the New Syntax or Old Syntax format is used for the arguments submit command. Note that in both syntaxes, double quote marks require two levels of escaping: one level is for the parsing of the DAG input file, and the other level is for passing the resulting value through condor_submit.
As of HTCondor version 8.3.7, single quotes are permitted within the value specification. For the specification of command line arguments, single quotes can be used in three ways:
As an example that shows uses of all special characters, here are only the relevant parts of a DAG input file. Note that the NodeA value for the macro second contains a tab.
    VARS NodeA first="Alberto Contador"
    VARS NodeA second="\"\"Andy	Schleck\"\""
    VARS NodeA third="Lance\\ Armstrong"
    VARS NodeA fourth="Vincenzo ''The Shark'' Nibali"
    VARS NodeA misc="!@#$%^&*()_-=+=[]{}?/"

    VARS NodeB first="Lance_Armstrong"
    VARS NodeB second="\\\"Andreas_Kloden\\\""
    VARS NodeB third="Ivan\\_Basso"
    VARS NodeB fourth="Bernard_'The_Badger'_Hinault"
    VARS NodeB misc="!@#$%^&*()_-=+=[]{}?/"

    VARS NodeC args="'Nairo Quintana' 'Chris Froome'"
Consider an example in which the submit description file for NodeA uses the New Syntax for the arguments command:
arguments = "'$(first)' '$(second)' '$(third)' '($fourth)' '$(misc)'"The single quotes around each variable reference are only necessary if the variable value may contain spaces or tabs. The resulting values passed to the NodeA executable are:
  Alberto Contador
  "Andy	Schleck"
  Lance\ Armstrong
  Vincenzo 'The Shark' Nibali
  !@#$%^&*()_-=+=[]{}?/
Consider an example in which the submit description file for NodeB uses the Old Syntax for the arguments command:
arguments = $(first) $(second) $(third) $(fourth) $(misc)
The resulting values passed to the NodeB executable are:
  Lance_Armstrong
  "Andreas_Kloden"
  Ivan\_Basso
  Bernard_'The_Badger'_Hinault
  !@#$%^&*()_-=+=[]{}?/
Consider an example in which the submit description file for NodeC uses the New Syntax for the arguments command:
arguments = "$(args)"
The resulting values passed to the NodeC executable are:
  Nairo Quintana
  Chris Froome
The $(JOB) and $(RETRY) macros may be used within a
definition of the string that defines a variable.
This usage requires parentheses,
such that proper macro substitution may take place when
the macro's value is only a portion of the string.
$(JOB) expands to the node JobName.
If the VARS line appears in a DAG file used as a splice file,
then $(JOB) will be the fully scoped name of the node.
For example, the DAG input file lines
  JOB  NodeC NodeC.submit
  VARS NodeC nodename="$(JOB)"
set nodename to NodeC, and the DAG input file lines
  JOB  NodeD NodeD.submit
  VARS NodeD outfilename="$(JOB)-output"
set outfilename to NodeD-output.
$(RETRY) expands to 0 the first time a node is run;
the value is incremented each time the node is retried.
For example:
VARS NodeE noderetry="$(RETRY)"
The macroname may also begin with a + character, in which case it names a ClassAd attribute. For example, the VARS specification
VARS NodeF +A="\"bob\""results in the job ClassAd attribute
A = "bob"Note that ClassAd string values must be quoted, hence there are escaped quotes in the example above. The outer quotes are consumed in the parsing of the DAG input file, so the escaped inner quotes remain in the definition of the attribute value.
Continuing this example, it allows the HTCondor submit description file for NodeF to use the following line:
arguments = "$$([A])"
The special macros may also be used. For example
VARS NodeG +B="$(RETRY)"places the numerical attribute
B = 1into the ClassAd when the NodeG job is run for a second time, which is the first retry and the value 1.
The PRIORITY command assigns a priority to a DAG node (and to the HTCondor job(s) associated with the node). The syntax for PRIORITY is
PRIORITY JobName|ALL_NODES PriorityValue
The priority value is an integer (which can be negative). A larger numerical priority is better. The default priority is 0.
The node priority affects the order in which nodes that are ready (all of their parent nodes have finished successfully) at the same time will be submitted. The node priority also sets the node job's priority in the queue (that is, its JobPrio attribute), which affects the order in which jobs will be run once they are submitted (see 2.7.1 for more information about job priority). The node priority only affects the order of job submission within a given DAG; but once jobs are submitted, their JobPrio value affects the order in which they will be run relative to all jobs submitted by the same user.
Sub-DAGs can have priorities, just as "regular" nodes can. (The priority of a sub-DAG will affect the priorities of its nodes: see "effective node priorities" below.) Splices cannot be assigned a priority, but individual nodes within a splice can be assigned priorities.
Note that node priority does not override the DAG dependencies. Also note that node priorities are not guarantees of the relative order in which nodes will be run, even among nodes that become ready at the same time - so node priorities should not be used as a substitute for parent/child dependencies. In other words, priorities should be used when it is preferable, but not required, that some jobs run before others. (The order in which jobs are run once they are submitted can be affected by many things other than the job's priority; for example, whether there are machines available in the pool that match the job's requirements.)
PRE scripts can affect the order in which jobs run, so DAGs containing PRE scripts may not submit the nodes in exact priority order, even if doing so would satisfy the DAG dependencies.
Node priority is most relevant if node submission is throttled (via the -maxjobs or -maxidle command-line arguments or the DAGMAN_MAX_JOBS_SUBMITTED or DAGMAN_MAX_JOBS_IDLE configuration variables), or if there are not enough resources in the pool to immediately run all submitted node jobs. This is often the case for DAGs with large numbers of "sibling" nodes, or DAGs running on heavily-loaded pools.
Adding PRIORITY for node C in the diamond-shaped DAG:
    # File name: diamond.dag
    #
    JOB  A  A.condor
    JOB  B  B.condor
    JOB  C  C.condor
    JOB  D  D.condor
    PARENT A CHILD B C
    PARENT B C CHILD D
    Retry  C 3
    PRIORITY C 1
This will cause node C to be submitted (and, mostly likely, run) before node B. Without this priority setting for node C, node B would be submitted first because the "JOB" statement for node B comes earlier in the DAG file than the "JOB" statement for node C.
The "effective" priority for a node (the priority controlling the order in which nodes are actually submitted, and which is assigned to JobPrio) is the sum of the explicit priority (specified in the DAG file) and the priority of the DAG itself. DAG priorities also default to 0, so they are most relevant for sub-DAGs (although a top-level DAG can be submitted with a non-zero priority by specifying a -priority value on the condor_submit_dag command line). This algorithm for calculating effective priorities is a simplification introduced in version 8.5.7 (a node's effective priority is no longer dependent on the priorities of its parents).
Here is an example to clarify:
    # File name: priorities.dag
    #
JOB A A.sub
SUBDAG EXTERNAL B SD.dag
PARENT A CHILD B
PRIORITY A 60
PRIORITY B 100

    # File name: SD.dag
    #
JOB SA SA.sub
JOB SB SB.sub
PARENT SA CHILD SB
PRIORITY SA 10
PRIORITY SB 20
In this example (assuming that priorities.dag is submitted with the default priority of 0), the effective priority of node A will be 60, and the effective priority of sub-DAG B will be 100. Therefore, the effective priority of node SA will be 110 and the effective priority of node SB will be 120.
The effective priorities listed above are assigned by DAGMan. There is no way to change the priority in the submit description file for a job, as DAGMan will override any priority command placed in a submit description file (unless the effective node priority is 0; in this case, any priority specified in the submit file will take effect).
In order to limit the number of submitted job clusters within a DAG, the nodes may be placed into categories by assignment of a name. Then, a maximum number of submitted clusters may be specified for each category.
The CATEGORY command assigns a category name to a DAG node. The syntax for CATEGORY is
CATEGORY JobName|ALL_NODES CategoryName
Category names cannot contain white space.
The MAXJOBS command limits the number of submitted job clusters on a per category basis. The syntax for MAXJOBS is
MAXJOBS CategoryName MaxJobsValue
If the number of submitted job clusters for a given category reaches the limit, no further job clusters in that category will be submitted until other job clusters within the category terminate. If MAXJOBS is not set for a defined category, then there is no limit placed on the number of submissions within that category.
Note that a single invocation of condor_submit results in one job cluster. The number of HTCondor jobs within a cluster may be greater than 1.
The configuration variable DAGMAN_MAX_JOBS_SUBMITTED and the condor_submit_dag -maxjobs command-line option are still enforced if these CATEGORY and MAXJOBS throttles are used.
Please see the end of section 2.10.9 on DAG Splicing for a description of the interaction between categories and splices.
All configuration variables and their definitions that relate to DAGMan may be found in section 3.5.23.
Configuration variables for condor_dagman can be specified in several ways, as given within the ordered list:
_CONDOR_ to the configuration variable's name.
For this ordered list, configuration values specified or parsed later in the list override ones specified earlier. For example, a value specified on the condor_submit_dag command line overrides corresponding values in any configuration file. And, a value specified in a DAGMan-specific configuration file overrides values specified in a general HTCondor configuration file.
The CONFIG command within the DAG input file specifies a configuration file to be used to set configuration variables related to condor_dagman when running this DAG. The syntax for CONFIG is
CONFIG ConfigFileName
As an example, if the DAG input file contains:
CONFIG dagman.configthen the configuration values in file dagman.config will be used for this DAG. If the contents of file dagman.config is
DAGMAN_MAX_JOBS_IDLE = 10then this configuration is defined for this DAG.
Only a single configuration file can be specified for a given condor_dagman run. For example, if one file is specified within a DAG input file, and a different file is specified on the condor_submit_dag command line, this is a fatal error at submit time. The same is true if different configuration files are specified in multiple DAG input files and referenced in a single condor_submit_dag command.
If multiple DAGs are run in a single condor_dagman run, the configuration options specified in the condor_dagman configuration file, if any, apply to all DAGs, even if some of the DAGs specify no configuration file.
Configuration variables that are not for condor_dagman and not utilized by DaemonCore, yet are specified in a condor_dagman-specific configuration file are ignored.
The SET_JOB_ATTR keyword within the DAG input file specifies an attribute/value pair to be set in the DAGMan job's ClassAd. The syntax for SET_JOB_ATTR is
SET_JOB_ATTR AttributeName=AttributeValue
As an example, if the DAG input file contains:
SET_JOB_ATTR TestNumber = 17the ClassAd of the DAGMan job itself will have an attribute TestNumber with the value 17.
The attribute set by the SET_JOB_ATTR command is set only in the ClassAd of the DAGMan job itself - it is not propagated to node jobs of the DAG.
Values with spaces can be set by surrounding the string containing a space with single or double quotes. (Note that the quote marks themselves will be part of the value.)
Only a single attribute/value pair can be specified per SET_JOB_ATTR command. If the same attribute is specified multiple times in the DAG (or in multiple DAGs run by the same DAGMan instance) the last-specified value is the one that will be utilized. An attribute set in the DAG file can be overridden by specifying
-append '+<attribute> = <value>'on the condor_submit_dag command line.
condor_dagman works by watching log files for events, such as submission, termination, and going on hold. When a new job is ready to be run, it is submitted to the condor_schedd, which needs to acquire a computing resource. Acquisition requires the condor_schedd to contact the central manager and get a claim on a machine, and this claim cycle can take many minutes.
Configuration variable DAGMAN_HOLD_CLAIM_TIME avoids the wait for a negotiation cycle. When set to a non zero value, the condor_schedd keeps a claim idle, such that the condor_startd delays in shifting from the Claimed to the Preempting state (see Figure 3.1). Thus, if another job appears that is suitable for the claimed resource, then the condor_schedd will submit the job directly to the condor_startd, avoiding the wait and overhead of a negotiation cycle. This results in a speed up of job completion, especially for linear DAGs in pools that have lengthy negotiation cycle times.
By default, DAGMAN_HOLD_CLAIM_TIME is 20, causing a claim to remain idle for 20 seconds, during which time a new job can be submitted directly to the already-claimed condor_startd. A value of 0 means that claims are not held idle for a running DAG. If a DAG node has no children, the value of DAGMAN_HOLD_CLAIM_TIME will be ignored; the KeepClaimIdle attribute will not be defined in the job ClassAd of the node job, unless the job requests it using the submit command keep_claim_idle.
A single use of condor_submit_dag may execute multiple, independent DAGs. Each independent DAG has its own, distinct DAG input file. These DAG input files are command-line arguments to condor_submit_dag.
Internally, all of the independent DAGs are combined into a single, larger DAG, with no dependencies between the original independent DAGs. As a result, any generated Rescue DAG file represents all of the original independent DAGs with a single DAG. The file name of this Rescue DAG is based on the DAG input file listed first within the command-line arguments. For example, assume that three independent DAGs are submitted with
condor_submit_dag A.dag B.dag C.dagThe first listed is A.dag. The remainder of the specialized file name adds a suffix onto this first DAG input file name, A.dag. The suffix is _multi.rescue<XXX>, where <XXX> is substituted by the 3-digit number of the Rescue DAG created as defined in section 2.10.10. The first time a Rescue DAG is created for the example, it will have the file name A.dag_multi.rescue001.
Other files such as dagman.out and the lock file also have names based on this first DAG input file.
The success or failure of the independent DAGs is well defined. When multiple, independent DAGs are submitted with a single command, the success of the composite DAG is defined as the logical AND of the success of each independent DAG. This implies that failure is defined as the logical OR of the failure of any of the independent DAGs.
By default, DAGMan internally renames the nodes to avoid node name collisions. If all node names are unique, the renaming of nodes may be disabled by setting the configuration variable DAGMAN_MUNGE_NODE_NAMES to False (see 3.5.23).
The INCLUDE command allows the contents of one DAG file to be parsed as if they were physically included in the referencing DAG file. The syntax for INCLUDE is
INCLUDE FileName
For example, if we have two DAG files like this:
# File name: foo.dag
#
    JOB  A  A.sub
    INCLUDE bar.dag

# File name: bar.dag
#
    JOB  B  B.sub
    JOB  C  C.sub
this is equivalent to the single DAG file:
    JOB  A  A.sub
    JOB  B  B.sub
    JOB  C  C.sub
Note that the included file must be in proper DAG syntax. Also, there are many cases where a valid included DAG file will cause a parse error, such as the including and included files defining nodes with the same name.
INCLUDEs can be nested to any depth (be sure not to create a cycle of includes!).
One use of the INCLUDE command is to simplify the DAG files when we have a single workflow that we want to run on a number of data sets. In that case, we can do something like this:
# File name: workflow.dag
# Defines the structure of the workflow
    JOB Split split.sub
    JOB Process00 process.sub
    ...
    JOB Process99 process.sub
    JOB Combine combine.sub
    PARENT Split CHILD Process00 ... Process99
    PARENT Process00 ... Process99 CHILD Combine

# File name: split.sub
    executable = my_split
    input = $(dataset).phase1
    output = $(dataset).phase2
    ...

# File name: data57.vars
    VARS Split dataset="data57"
    VARS Process00 dataset="data57"
    ...
    VARS Process99 dataset="data57"
    VARS Combine dataset="data57"

# File name: run_dataset57.dag
    INCLUDE workflow.dag
    INCLUDE data57.vars
Then, to run our workflow on dataset 57, we run the following command:
condor_submit_dag run_dataset57.dag
This avoids having to duplicate the JOB and PARENT/CHILD commands for every dataset - we can just re-use the workflow.dag file, in combination with a dataset-specific vars file.
The organization and dependencies of the jobs within a DAG are the keys to its utility. Some workflows are naturally constructed hierarchically, such that a node within a DAG is also a DAG (instead of a "simple" HTCondor job). HTCondor DAGMan handles this situation easily, and allows DAGs to be nested to any depth.
There are two ways that DAGs can be nested within other DAGs: sub-DAGs (see 2.10.9) and splices (see 2.10.9).
With sub-DAGs, each DAG has its own condor_dagman job, which then becomes a node job within the higher-level DAG. With splices, on the other hand, the nodes of the spliced DAG are directly incorporated into the higher-level DAG. Therefore, splices do not result in additional condor_dagman instances.
A weakness in scalability exists when submitting external sub-DAGs, because each executing independent DAG requires its own instance of condor_dagman to be running. The outer DAG has an instance of condor_dagman, and each named SUBDAG has an instance of condor_dagman while it is in the HTCondor queue. The scaling issue presents itself when a workflow contains hundreds or thousands of sub-DAGs that are queued at the same time. (In this case, the resources (especially memory) consumed by the multiple condor_dagman instances can be a problem.) Further, there may be many Rescue DAGs created if a problem occurs. (Note that the scaling issue depends only on how many sub-DAGs are queued at any given time, not the total number of sub-DAGs in a given workflow; division of a large workflow into sequential sub-DAGs can actually enhance scalability.) To alleviate these concerns, the DAGMan language introduces the concept of graph splicing.
Because splices are simpler in some ways than sub-DAGs, they are generally preferred unless certain features are needed that are only available with sub-DAGs. This document: https://htcondor-wiki.cs.wisc.edu/index.cgi/wiki?p=SubDagsVsSplices explains the pros and cons of splices and external sub-DAGs, and should help users decide which alternative is better for their application.
Note that sub-DAGs and splices can be combined in a single workflow, and can be nested to any depth (but be sure to avoid recursion, which will cause problems!).
As stated above, the SUBDAG EXTERNAL command causes the specified DAG file to be run by a separate instance of condor_dagman, with the condor_dagman job becoming a node job within the higher-level DAG.
The syntax for the SUBDAG command is
SUBDAG EXTERNAL JobName DagFileName [DIR directory] [NOOP] [DONE]
The optional specifications of DIR, NOOP, and DONE, if used, must appear in this order within the entry. NOOP and DONE for SUBDAG nodes have the same effect that they do for JOB nodes.
A SUBDAG node is essentially the same as any other node, except that the DAG input file for the inner DAG is specified, instead of the HTCondor submit file. The keyword EXTERNAL means that the SUBDAG is run within its own instance of condor_dagman.
Since more than one DAG is being discussed, here is terminology introduced to clarify which DAG is which. Reuse the example diamond-shaped DAG as given in Figure 2.2. Assume that node B of this diamond-shaped DAG will itself be a DAG. The DAG of node B is called a SUBDAG, inner DAG, or lower-level DAG. The diamond-shaped DAG is called the outer or top-level DAG.
Work on the inner DAG first. Here is a very simple linear DAG input file used as an example of the inner DAG.
    # File name: inner.dag
    #
    JOB  X  X.submit
    JOB  Y  Y.submit
    JOB  Z  Z.submit
    PARENT X CHILD Y
    PARENT Y CHILD Z
The HTCondor submit description file, used by condor_dagman, corresponding to inner.dag will be named inner.dag.condor.sub. The DAGMan submit description file is always named <DAG file name>.condor.sub. Each DAG or SUBDAG results in the submission of condor_dagman as an HTCondor job, and condor_submit_dag creates this submit description file.
The preferred specification of the DAG input file for the outer DAG is
# File name: diamond.dag
#
    JOB  A  A.submit
    SUBDAG EXTERNAL  B  inner.dag
    JOB  C  C.submit
    JOB  D  D.submit
    PARENT A CHILD B C
    PARENT B C CHILD D
Within the outer DAG's input file, the SUBDAG command specifies a special case of a JOB node, where the job is itself a DAG.
One of the benefits of using the SUBDAG feature is that portions of the overall workflow can be constructed and modified during the execution of the DAG (a SUBDAG file doesn't have to exist until just before it is submitted). A drawback can be that each SUBDAG causes its own distinct job submission of condor_dagman, leading to a larger number of jobs, together with their potential need of carefully constructed policy configuration to throttle node submission or execution (because each SUBDAG has its own throttles).
Here are details that affect SUBDAGs:
There are three ways to generate the <DAG file name>.condor.sub file of a SUBDAG:
When the <DAG file name>.condor.sub file is generated lazily, this file is generated immediately before the SUBDAG job is submitted. Generation is accomplished by running
condor_submit_dag -no_submiton the DAG input file specified in the SUBDAG entry. This is the default behavior. There are advantages to this lazy mode of submit description file creation for the SUBDAG:
The main disadvantage of lazy submit file generation is that a syntax error in the DAG input file of a SUBDAG will not be discovered until the outer DAG tries to run the inner DAG.
When <DAG file name>.condor.sub files are generated eagerly, condor_submit_dag runs itself recursively (with the -no_submit option) on each SUBDAG, so all of the <DAG file name>.condor.sub files are generated before the top-level DAG is actually submitted. To generate the <DAG file name>.condor.sub files eagerly, pass the -do_recurse flag to condor_submit_dag; also set the DAGMAN_GENERATE_SUBDAG_SUBMITS configuration variable to False, so that condor_dagman does not re-run condor_submit_dag at run time thereby regenerating the submit description files.
To generate the .condor.sub files manually, run
condor_submit_dag -no_submiton each lower-level DAG file, before running condor_submit_dag on the top-level DAG file; also set the DAGMAN_GENERATE_SUBDAG_SUBMITS configuration variable to False, so that condor_dagman does not re-run condor_submit_dag at run time. The main reason for generating the <DAG file name>.condor.sub files manually is to set options for the lower-level DAG that one would not otherwise be able to set An example of this is the -insert_sub_file option. For instance, using the given example do the following to manually generate HTCondor submit description files:
  condor_submit_dag -no_submit -insert_sub_file fragment.sub inner.dag
  condor_submit_dag diamond.dag
Note that most condor_submit_dag command-line flags have corresponding configuration variables, so we encourage the use of per-DAG configuration files, especially in the case of nested DAGs. This is the easiest way to set different options for different DAGs in an overall workflow.
It is possible to combine more than one method of generating the <DAG file name>.condor.sub files. For example, one might pass the -do_recurse flag to condor_submit_dag, but leave the DAGMAN_GENERATE_SUBDAG_SUBMITS configuration variable set to the default of True. Doing this would provide the benefit of an immediate error message at submit time, if there is a syntax error in one of the inner DAG input files, but the lower-level <DAG file name>.condor.sub files would still be regenerated before each nested DAG is submitted.
The values of the following command-line flags are passed from the top-level condor_submit_dag instance to any lower-level condor_submit_dag instances. This occurs whether the lower-level submit description files are generated lazily or eagerly:
The values of the following command-line flags are preserved in any already-existing lower-level DAG submit description files:
Other command-line arguments are set to their defaults in any lower-level invocations of condor_submit_dag.
The -force option will cause existing DAG submit description files to be overwritten without preserving any existing values.
The outer DAG is submitted as before, with the command
condor_submit_dag diamond.dag
The use of new-style Rescue DAGs is now the default. With new-style rescue DAGs, the appropriate rescue DAG(s) will be run automatically if there is a failure somewhere in the workflow. For example (given the DAGs in the example at the beginning of the SUBDAG section), if one of the nodes in inner.dag fails, this will produce a Rescue DAG for inner.dag (named inner.dag.rescue.001). Then, since inner.dag failed, node B of diamond.dag will fail, producing a Rescue DAG for diamond.dag (named diamond.dag.rescue.001, etc.). If the command
condor_submit_dag diamond.dagis re-run, the most recent outer Rescue DAG will be run, and this will re-run the inner DAG, which will in turn run the most recent inner Rescue DAG.
Remember that, unless the DIR keyword is used in the outer DAG, the inner DAG utilizes the current working directory when the outer DAG is submitted. Therefore, all paths utilized by the inner DAG file must be specified accordingly.
As stated above, the SPLICE command causes the nodes of the spliced DAG to be directly incorporated into the higher-level DAG (the DAG containing the SPLICE command).
The syntax for the SPLICE command is
SPLICE SpliceName DagFileName [DIR directory]
A splice is a named instance of a subgraph which is specified in a separate DAG file. The splice is treated as an entity for dependency specification in the including DAG. (Conceptually, a splice is treated as a node within the DAG containing the SPLICE command, although there are some limitations, which are discussed below. This means, for example, that splices can have parents and children.) A splice can also be incorporated into an including DAG without any dependencies; it is then considered a disjoint DAG within the including DAG.
The same DAG file can be reused as differently named splices, each one incorporating a copy of the dependency graph (and nodes therein) into the including DAG.
The nodes within a splice are scoped according to
a hierarchy of names associated with the splices,
as the splices are parsed from the top level DAG file.
The scoping character to describe the
inclusion hierarchy of nodes into the top level dag is
'+'. (In other words, if a splice named "SpliceX" contains
a node named "NodeY", the full node name once the DAGs are parsed
is "SpliceX+NodeY".
This character is chosen due
to a restriction in the allowable characters which may be in a file name
across the variety of platforms that HTCondor supports.
In any DAG input file, all splices must have unique names,
but the same splice name may be reused in different DAG input files.
HTCondor does not detect nor support splices that form a cycle within the DAG. A DAGMan job that causes a cyclic inclusion of splices will eventually exhaust available memory and crash.
The SPLICE command in a DAG input file creates a named instance of a DAG as specified in another file as an entity which may have PARENT and CHILD dependencies associated with other splice names or node names in the including DAG file.
The following series of examples illustrate potential uses of splicing. To simplify the examples, presume that each and every job uses the same, simple HTCondor submit description file:
  # BEGIN SUBMIT FILE submit.condor
  executable   = /bin/echo
  arguments    = OK
  universe     = vanilla
  output       = $(jobname).out
  error        = $(jobname).err
  log          = submit.log
  notification = NEVER
  queue
  # END SUBMIT FILE submit.condor
This first simple example splices a diamond-shaped DAG in between the two nodes of a top level DAG. Here is the DAG input file for the diamond-shaped DAG:
  # BEGIN DAG FILE diamond.dag
  JOB A submit.condor
  VARS A jobname="$(JOB)"

  JOB B submit.condor
  VARS B jobname="$(JOB)"

  JOB C submit.condor
  VARS C jobname="$(JOB)"

  JOB D submit.condor
  VARS D jobname="$(JOB)"

  PARENT A CHILD B C
  PARENT B C CHILD D
  # END DAG FILE diamond.dag
The top level DAG incorporates the diamond-shaped splice:
  # BEGIN DAG FILE toplevel.dag
  JOB X submit.condor
  VARS X jobname="$(JOB)"

  JOB Y submit.condor
  VARS Y jobname="$(JOB)"

  # This is an instance of diamond.dag, given the symbolic name DIAMOND
  SPLICE DIAMOND diamond.dag

  # Set up a relationship between the nodes in this dag and the splice

  PARENT X CHILD DIAMOND
  PARENT DIAMOND CHILD Y

  # END DAG FILE toplevel.dag
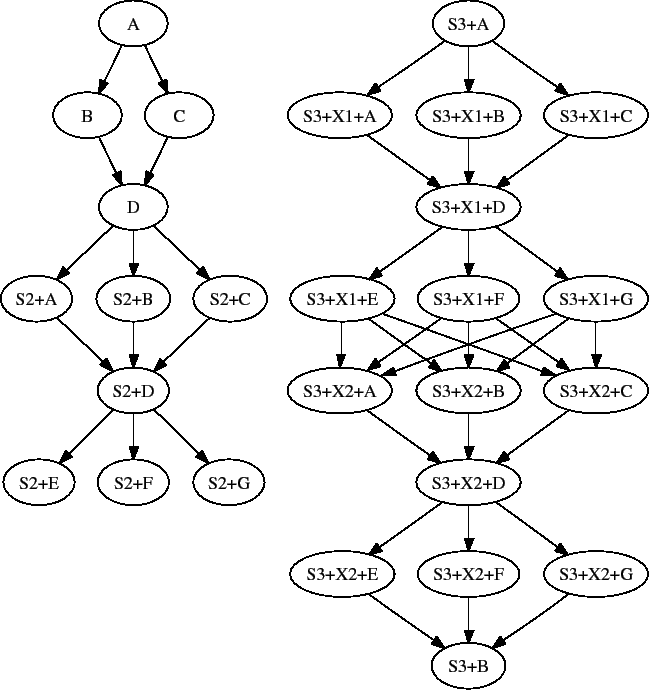
Figure 2.3 illustrates the resulting top level DAG and the dependencies produced. Notice the naming of nodes scoped with the splice name. This hierarchy of splice names assures unique names associated with all nodes.
Figure 2.4 illustrates the starting point for a more complex example. The DAG input file X.dag describes this X-shaped DAG. The completed example displays more of the spatial constructs provided by splices. Pay particular attention to the notion that each named splice creates a new graph, even when the same DAG input file is specified.
  # BEGIN DAG FILE X.dag

  JOB A submit.condor
  VARS A jobname="$(JOB)"

  JOB B submit.condor
  VARS B jobname="$(JOB)"

  JOB C submit.condor
  VARS C jobname="$(JOB)"

  JOB D submit.condor
  VARS D jobname="$(JOB)"

  JOB E submit.condor
  VARS E jobname="$(JOB)"

  JOB F submit.condor
  VARS F jobname="$(JOB)"

  JOB G submit.condor
  VARS G jobname="$(JOB)"

  # Make an X-shaped dependency graph
  PARENT A B C CHILD D
  PARENT D CHILD E F G

  # END DAG FILE X.dag
File s1.dag continues the example, presenting the DAG input file that incorporates two separate splices of the X-shaped DAG. Figure 2.5 illustrates the resulting DAG.
  # BEGIN DAG FILE s1.dag

  JOB A submit.condor
  VARS A jobname="$(JOB)"

  JOB B submit.condor
  VARS B jobname="$(JOB)"

  # name two individual splices of the X-shaped DAG
  SPLICE X1 X.dag
  SPLICE X2 X.dag

  # Define dependencies
  # A must complete before the initial nodes in X1 can start
  PARENT A CHILD X1
  # All final nodes in X1 must finish before
  # the initial nodes in X2 can begin
  PARENT X1 CHILD X2
  # All final nodes in X2 must finish before B may begin.
  PARENT X2 CHILD B

  # END DAG FILE s1.dag
The top level DAG in the hierarchy of this complex example is described by the DAG input file toplevel.dag. Figure 2.6 illustrates the final DAG. Notice that the DAG has two disjoint graphs in it as a result of splice S3 not having any dependencies associated with it in this top level DAG.
  # BEGIN DAG FILE toplevel.dag

  JOB A submit.condor
  VARS A jobname="$(JOB)"

  JOB B submit.condor
  VARS B jobname="$(JOB)"

  JOB C submit.condor
  VARS C jobname="$(JOB)"

  JOB D submit.condor
  VARS D jobname="$(JOB)"

  # a diamond-shaped DAG
  PARENT A CHILD B C
  PARENT B C CHILD D

  # This splice of the X-shaped DAG can only run after
  # the diamond dag finishes
  SPLICE S2 X.dag
  PARENT D CHILD S2

  # Since there are no dependencies for S3,
  # the following splice is disjoint
  SPLICE S3 s1.dag

  # END DAG FILE toplevel.dag
Because the nodes of a splice are directly incorporated into the DAG containing the SPLICE command, splices do not generate their own rescue DAGs, unlike SUBDAG EXTERNALs.
The DIR option specifies a working directory for a splice, from which the splice will be parsed and the jobs within the splice submitted. The directory associated with the splice's DIR specification will be propagated as a prefix to all nodes in the splice and any included splices. If a node already has a DIR specification, then the splice's DIR specification will be a prefix to the node's, separated by a directory separator character. Jobs in included splices with an absolute path for their DIR specification will have their DIR specification untouched. Note that a DAG containing DIR specifications cannot be run in conjunction with the -usedagdir command-line argument to condor_submit_dag.
A "full" rescue DAG generated by a DAG run with the -usedagdir argument will contain DIR specifications, so such a rescue DAG must be run without the -usedagdir argument. (Note that "full" rescue DAGs are no longer the default.)
A PRE or POST script may not be specified for a splice (however, nodes within a spliced DAG can have PRE and POST scripts). (The reason for this is that, when the DAG is parsed, the splices are also parsed and the splice nodes are directly incorporated into the DAG containing the SPLICE command. Therefore, once parsing is complete, there are no actual nodes corresponding to the splice itself to which to "attach" the PRE or POST scripts.)
To achieve the desired effect of having a PRE script associated with a splice, introduce a new NOOP node into the DAG with the splice as a dependency. Attach the PRE script to the NOOP node.
  # BEGIN DAG FILE example1.dag

  # Names a node with no associated node job, a NOOP node
  # Note that the file noop.submit does not need to exist
  JOB OnlyPreNode noop.submit NOOP

  # Attach a PRE script to the NOOP node
  SCRIPT PRE OnlyPreNode prescript.sh

  # Define the splice
  SPLICE TheSplice thenode.dag

  # Define the dependency
  PARENT OnlyPreNode CHILD TheSplice

  # END DAG FILE example1.dag
The same technique is used to achieve the effect of having a POST script associated with a splice. Introduce a new NOOP node into the DAG as a child of the splice, and attach the POST script to the NOOP node.
  # BEGIN DAG FILE example2.dag

  # Names a node with no associated node job, a NOOP node
  # Note that the file noop.submit does not need to exist.
  JOB OnlyPostNode noop.submit NOOP

  # Attach a POST script to the NOOP node
  SCRIPT POST OnlyPostNode postscript.sh

  # Define the splice
  SPLICE TheSplice thenode.dag

  # Define the dependency
  PARENT TheSplice CHILD OnlyPostNode

  # END DAG FILE example2.dag
A RETRY, VARS or PRIORITY command cannot be specified for a SPLICE; however, individual nodes within a spliced DAG can have a RETRY, VARS or PRIORITY specified.
Here is an example showing a DAG that will not be parsed successfully:
  # top level DAG input file
  JOB    A a.sub
  SPLICE B b.dag
  PARENT A  CHILD B

  # cannot work, as B is not a node in the DAG once
  # splice B is incorporated
  RETRY B 3
  VARS B dataset="10"
  PRIORITY B 20
The following example will work:
  # top level DAG input file
  JOB    A a.sub
  SPLICE B b.dag
  PARENT A  CHILD B

  # file: b.dag
  JOB    X x.sub
  RETRY X 3
  VARS X dataset="10"
  PRIORITY X 20
When RETRY is desired on an entire subgraph of a workflow, sub-DAGs (see above) must be used instead of splices.
Here is the same example, now defining job B as a SUBDAG, and effecting RETRY on that SUBDAG.
  # top level DAG input file
  JOB    A a.sub
  SUBDAG EXTERNAL B b.dag
  PARENT A  CHILD B

  RETRY B 3
Categories normally refer only to nodes within a given splice. All of the assignments of nodes to a category, and the setting of the category throttle, should be done within a single DAG file. However, it is now possible to have categories include nodes from within more than one splice. To do this, the category name is prefixed with the '+' (plus) character. This tells DAGMan that the category is a cross-splice category. Towards deeper understanding, what this really does is prevent renaming of the category when the splice is incorporated into the upper-level DAG. The MAXJOBS specification for the category can appear in either the upper-level DAG file or one of the splice DAG files. It probably makes the most sense to put it in the upper-level DAG file.
Here is an example which applies a single limitation on submitted jobs, identifying the category with +init.
# relevant portion of file name: upper.dag

    SPLICE A splice1.dag
    SPLICE B splice2.dag

    MAXJOBS +init 2
# relevant portion of file name: splice1.dag

    JOB C C.sub
    CATEGORY C +init
    JOB D D.sub
    CATEGORY D +init
# relevant portion of file name: splice2.dag

    JOB X X.sub
    CATEGORY X +init
    JOB Y Y.sub
    CATEGORY Y +init
For both global and non-global category throttles, settings at a higher level in the DAG override settings at a lower level. In this example:
# relevant portion of file name: upper.dag

    SPLICE A lower.dag

    MAXJOBS A+catX 10
    MAXJOBS +catY 2


# relevant portion of file name: lower.dag

    MAXJOBS catX 5
    MAXJOBS +catY 1
the resulting throttle settings are 2 for the +catY category and 10 for the A+catX category in splice. Note that non-global category names are prefixed with their splice name(s), so to refer to a non-global category at a higher level, the splice name must be included.
In the "default" usage of splices described above, when one splice is the parent of another splice, all "terminal" nodes (nodes with no children) of the parent splice become parents of all "initial" nodes (nodes with no parents) of the child splice. The CONNECT, PIN_IN, and PIN_OUT commands (added in version 8.5.7) allow more flexible dependencies between splices. (The terms PIN_IN and PIN_OUT were chosen because of the hardware analogy.)
The syntax for CONNECT is
CONNECT OutputSpliceName InputSpliceName
The syntax for PIN_IN is
PIN_IN NodeName PinNumber
The syntax for PIN_OUT is
PIN_OUT NodeName PinNumber
All output splice nodes connected to a given pin_out will become parents of all input splice nodes connected to the corresponding pin_in. (The pin_ins and pin_outs exist only to create the correct parent/child dependencies between nodes. Once the DAG is parsed, there are no actual DAG objects corresponding to the pin_ins and pin_outs.)
Any given splice can contain both PIN_IN and PIN_OUT definitions, and can be both an input and output splice in different CONNECT commands. Furthermore, a splice can appear in any number of CONNECT commands (for example, a given splice could be the output splice in two CONNECT commands that have different input splices). It is not an error for a splice to have PIN_IN or PIN_OUT definitions that are not associated with a CONNECT command - such PIN_IN and PIN_OUT commands are simply ignored.
Note that the pin_ins and pin_outs must be defined within the relevant splices (this can be done with INCLUDE commands), not in the DAG that connects the splices.
There are a number of restrictions on splice connections:
Note: it is probably desireable for any "terminal" node (a node with no children) in the output splice to be connected to a pin_out - but this is not required.
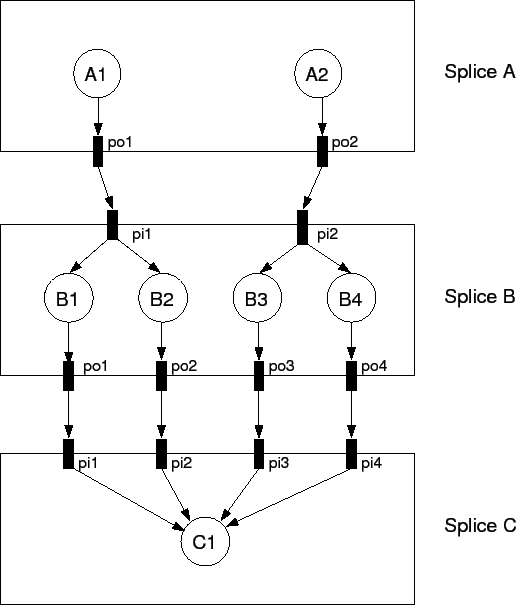
Here is a simple example:
# File: top.dag
    SPLICE A spliceA.dag
    SPLICE B spliceB.dag
    SPLICE C spliceC.dag

    CONNECT A B
    CONNECT B C

# File: spliceA.dag
    JOB A1 A1.sub
    JOB A2 A2.sub

    PIN_OUT A1 1
    PIN_OUT A2 2

# File: spliceB.dag
    JOB B1 B1.sub
    JOB B2 B2.sub
    JOB B3 B3.sub
    JOB B4 B4.sub

    PIN_IN B1 1
    PIN_IN B2 1
    PIN_IN B3 2
    PIN_IN B4 2

    PIN_OUT B1 1
    PIN_OUT B2 2
    PIN_OUT B3 3
    PIN_OUT B4 4

# File: spliceC.dag
    JOB C1 C1.sub

    PIN_IN C1 1
    PIN_IN C1 2
    PIN_IN C1 3
    PIN_IN C1 4
In this example, node A1 will be the parent of B1 and B2; node
A2 will be the parent of B3 and B4; and nodes B1, B2, B3 and B4 will all
be parents of C1.
A diagram of the above example:
A FINAL node is a single and special node that is always run at the end of the DAG, even if previous nodes in the DAG have failed. A FINAL node can be used for tasks such as cleaning up intermediate files and checking the output of previous nodes. The FINAL command in the DAG input file specifies a node job to be run at the end of the DAG.
The syntax used for the FINAL command is
FINAL JobName SubmitDescriptionFileName [DIR directory] [NOOP]
The FINAL node within the DAG is identified by JobName, and the HTCondor job is described by the contents of the HTCondor submit description file given by SubmitDescriptionFileName.
The keywords DIR and NOOP are as detailed in section 2.10.2. If both DIR and NOOP are used, they must appear in the order shown within the syntax specification.
There may only be one FINAL node in a DAG. A parse error will be logged by the condor_dagman job in the dagman.out file, if more than one FINAL node is specified.
The FINAL node is virtually always run. It is run if the condor_dagman job is removed with condor_rm. The only case in which a FINAL node is not run is if the configuration variable DAGMAN_STARTUP_CYCLE_DETECT is set to True, and a cycle is detected at start up time. If DAGMAN_STARTUP_CYCLE_DETECT is set to False and a cycle is detected during the course of the run, the FINAL node will be run.
The success or failure of the FINAL node determines the success or failure of the entire DAG, overriding the status of all previous nodes. This includes any status specified by any ABORT-DAG-ON specification that has taken effect. If some nodes of a DAG fail, but the FINAL node succeeds, the DAG will be considered successful. Therefore, it is important to be careful about setting the exit status of the FINAL node.
The $DAG_STATUS and $FAILED_COUNT macros can be used both as PRE and POST script arguments, and in node job submit description files. As an example of this, here are the partial contents of the DAG input file,
    FINAL final_node final_node.sub
    SCRIPT PRE final_node final_pre.pl $DAG_STATUS $FAILED_COUNT
and here are the partial contents of the submit description file, final_node.sub
arguments = "$(DAG_STATUS) $(FAILED_COUNT)"
If there is a FINAL node specified for a DAG, it will be run at the end of the workflow. If this FINAL node must not do anything in certain cases, use the $DAG_STATUS and $FAILED_COUNT macros to take appropriate actions. Here is an example of that behavior. It uses a PRE script that aborts if the DAG has been removed with condor_rm, which, in turn, causes the FINAL node to be considered failed without actually submitting the HTCondor job specified for the node. Partial contents of the DAG input file:
    FINAL final_node final_node.sub
    SCRIPT PRE final_node final_pre.pl $DAG_STATUS
and partial contents of the Perl PRE script, final_pre.pl:
    #! /usr/bin/env perl

    if ($ARGV[0] eq 4) {
        exit(1);
    }
There are restrictions on the use of a FINAL node. The DONE option is not allowed for a FINAL node. And, a FINAL node may not be referenced in any of the following specifications:
As of HTCondor version 8.3.7, DAGMan allows at most two submit attempts of a FINAL node, if the DAG has been removed from the queue with condor_rm.
In the following commands, a specific node name can be replaced by the option ALL_NODES:
This will cause the given command to apply to all nodes (except any FINAL node) in that DAG.
The ALL_NODES never applies to a FINAL node. (If the ALL_NODES option is used in a DAG that has a FINAL node, the dagman.out file will contain messages noting that the FINAL node is skipped when parsing the relevant commands.)
The ALL_NODES option is case-insensitive.
It is important to note that the ALL_NODES option does not apply across splices and sub-DAGs. In other words, an ALL_NODES option within a splice or sub-DAG will apply only to nodes within that splice or sub-DAG; also, an ALL_NODES option in a parent DAG will not apply to any splices or sub-DAGs referenced by the parent DAG.
The ALL_NODES option does work in combination with the INCLUDE command. In other words, a command within an included file that uses the ALL_NODES option will apply to all nodes in the including DAG (again, except any FINAL node).
As of version 8.5.8, the ALL_NODES option cannot be used when multiple DAG files are specified on the condor_submit_dag command line. Hopefully this limitation will be fixed in a future release.
When multiple commands (whether using the ALL_NODES option or not) set a given property of a DAG node, the last relevant command overrides earlier commands, as shown in the following examples:
For example, in this DAG:
    JOB A node.sub
    VARS A name="A"
    VARS ALL_NODES name="X"
the value of name for node A will be "X".
In this DAG:
    JOB A node.sub
    VARS A name="A"
    VARS ALL_NODES name="X"
    VARS A name="foo"
the value of name for node A will be "foo".
Here is an example DAG using the ALL_NODES option:
# File: all_ex.dag
    JOB A node.sub
    JOB B node.sub
    JOB C node.sub

    SCRIPT PRE ALL_NODES my_script $JOB

    VARS ALL_NODES name="$(JOB)"

    # This overrides the above VARS command for node B.
    VARS B name="nodeB"

    RETRY all_nodes 3
Any time a DAG exits unsuccessfully, DAGMan generates a Rescue DAG. The Rescue DAG records the state of the DAG, with information such as which nodes completed successfully, and the Rescue DAG will be used when the DAG is again submitted. With the Rescue DAG, nodes that have already successfully completed are not re-run.
There are a variety of circumstances under which a Rescue DAG is generated. If a node in the DAG fails, the DAG does not exit immediately; the remainder of the DAG is continued until no more forward progress can be made based on the DAG's dependencies. At this point, DAGMan produces the Rescue DAG and exits. A Rescue DAG is produced on Unix platforms if the condor_dagman job itself is removed with condor_rm. On Windows, a Rescue DAG is not generated in this situation, but re-submitting the original DAG will invoke a lower-level recovery functionality, and it will produce similar behavior to using a Rescue DAG. A Rescue DAG is produced when a node sets and triggers an ABORT-DAG-ON event with a non-zero return value. A zero return value constitutes successful DAG completion, and therefore a Rescue DAG is not generated.
By default, if a Rescue DAG exists, it will be used when the DAG is submitted specifying the original DAG input file. If more than one Rescue DAG exists, the newest one will be used. By using the Rescue DAG, DAGMan will avoid re-running nodes that completed successfully in the previous run. Note that passing the -force option to condor_submit_dag or condor_dagman will cause condor_dagman to not use any existing rescue DAG. This means that previously-completed node jobs will be re-run.
The granularity defining success or failure in the Rescue DAG is the node. For a node that fails, all parts of the node will be re-run, even if some parts were successful the first time. For example, if a node's PRE script succeeds, but then the node's HTCondor job cluster fails, the entire node, including the PRE script, will be re-run. A job cluster may result in the submission of multiple HTCondor jobs. If one of the jobs within the cluster fails, the node fails. Therefore, the Rescue DAG will re-run the entire node, implying the submission of the entire cluster of jobs, not just the one(s) that failed.
Statistics about the failed DAG execution are presented as comments at the beginning of the Rescue DAG input file.
The file name of the Rescue DAG is obtained by
appending the string
.rescue<XXX> to the original DAG input file name.
Values for <XXX> start at 001 and continue
to 002, 003, and beyond.
The configuration variable DAGMAN_MAX_RESCUE_NUM
sets a maximum value for <XXX>;
see section 3.5.23 for the complete definition
of this configuration variable. If you hit the
DAGMAN_MAX_RESCUE_NUM limit, the last Rescue DAG file
is overwritten if the DAG fails again.
If a Rescue DAG exists when the original DAG is re-submitted,
the Rescue DAG with the largest magnitude value for <XXX>
will be used, and its usage is implied.
Here is an example showing file naming and DAG submission for the case of a failed DAG. The initial DAG is submitted with
condor_submit_dag my.dagA failure of this DAG results in the Rescue DAG named my.dag.rescue001. The DAG is resubmitted using the same command:
condor_submit_dag my.dagThis resubmission of the DAG uses the Rescue DAG file my.dag.rescue001, because it exists. Failure of this Rescue DAG results in another Rescue DAG called my.dag.rescue002. If the DAG is again submitted, using the same command as with the first two submissions, but not repeated here, then this third submission uses the Rescue DAG file my.dag.rescue002, because it exists, and because the value
002 is larger
in magnitude than 001.
To explicitly specify a particular Rescue DAG,
use the optional command-line argument -dorescuefrom
with condor_submit_dag.
Note that this will have the side effect of renaming
existing Rescue DAG files with larger magnitude values
of <XXX>.
Each renamed file has its existing name appended with
the string .old.
For example, assume that my.dag has failed 4 times,
resulting in the Rescue DAGs named
my.dag.rescue001,
my.dag.rescue002,
my.dag.rescue003,
and
my.dag.rescue004.
A decision is made to re-run using my.dag.rescue002.
The submit command is
condor_submit_dag -dorescuefrom 2 my.dagThe DAG specified by the DAG input file my.dag.rescue002 is submitted. And, the existing Rescue DAG my.dag.rescue003 is renamed to be my.dag.rescue003.old, while the existing Rescue DAG my.dag.rescue004 is renamed to be my.dag.rescue004.old.
Note that if multiple DAG input files are specified on the condor_submit_dag command line, a single Rescue DAG encompassing all of the input DAGs is generated. A DAG file containing splices also produces a single Rescue DAG file. On the other hand, a DAG containing sub-DAGs will produce a separate Rescue DAG for each sub-DAG that is queued (and for the top-level DAG).
If the Rescue DAG file is generated before all retries of a node are completed, then the Rescue DAG file will also contain Retry entries. The number of retries will be set to the appropriate remaining number of retries. The configuration variable DAGMAN_RESET_RETRIES_UPON_RESCUE, section 3.5.23, controls whether or not node retries are reset in a Rescue DAG.
As of HTCondor version 7.7.2, the Rescue DAG file is a partial DAG file, not a complete DAG input file as in the past.
A partial Rescue DAG file contains only information about which nodes are done, and the number of retries remaining for nodes with retries. It does not contain information such as the actual DAG structure and the specification of the submit description file for each node job. Partial Rescue DAGs are automatically parsed in combination with the original DAG input file, which contains information about the DAG structure. This updated implementation means that a change in the original DAG input file, such as specifying a different submit description file for a node job, will take effect when running the partial Rescue DAG. In other words, you can fix mistakes in the original DAG file while still gaining the benefit of using the Rescue DAG.
To use a partial Rescue DAG, you must re-run condor_submit_dag on the original DAG file, not the Rescue DAG file.
Note that the existence of a DONE specification in a partial Rescue DAG for a node that no longer exists in the original DAG input file is a warning, as opposed to an error, unless the DAGMAN_USE_STRICT configuration variable is set to a value of 1 or higher (which is now the default). Comment out the line with DONE in the partial Rescue DAG file to avoid a warning or error.
The previous (prior to version 7.7.2) behavior of producing full DAG input file as the Rescue DAG is obtained by setting the configuration variable DAGMAN_WRITE_PARTIAL_RESCUE to the non-default value of False. Note that the option to generate full Rescue DAGs is likely to disappear some time during the 8.3 series.
To run a full Rescue DAG, either one left over from an older version of DAGMan, or one produced by setting DAGMAN_WRITE_PARTIAL_RESCUE to False, directly specify the full Rescue DAG file on the command line instead of the original DAG file. For example:
condor_submit_dag my.dag.rescue002
Attempting to re-submit the original DAG file, if the Rescue DAG file is a complete DAG, will result in a parse failure.
Starting in HTCondor version 7.5.5, passing the -DumpRescue option to either condor_dagman or condor_submit_dag causes condor_dagman to output a Rescue DAG file, even if the parsing of a DAG input file fails. In this parse failure case, condor_dagman produces a specially named Rescue DAG containing whatever it had successfully parsed up until the point of the parse error. This Rescue DAG may be useful in debugging parse errors in complex DAGs, especially ones using splices. This incomplete Rescue DAG is not meant to be used when resubmitting a failed DAG. Note that this incomplete Rescue DAG generated by the -DumpRescue option is a full DAG input file, as produced by versions of HTCondor prior to HTCondor version 7.7.2. It is not a partial Rescue DAG file, regardless of the value of the configuration variable DAGMAN_WRITE_PARTIAL_RESCUE.
To avoid confusion between this incomplete Rescue DAG generated in the case of a parse failure and a usable Rescue DAG, a different name is given to the incomplete Rescue DAG. The name appends the string .parse_failed to the original DAG input file name. Therefore, if the submission of a DAG with
condor_submit_dag my.daghas a parse failure, the resulting incomplete Rescue DAG will be named my.dag.parse_failed.
To further prevent one of these incomplete Rescue DAG files from being used, a line within the file contains the single command REJECT. This causes condor_dagman to reject the DAG, if used as a DAG input file. This is done because the incomplete Rescue DAG may be a syntactically correct DAG input file. It will be incomplete relative to the original DAG, such that if the incomplete Rescue DAG could be run, it could erroneously be perceived as having successfully executed the desired workflow, when, in fact, it did not.
DAG recovery restores the state of a DAG upon resubmission. Recovery is accomplished by reading the .nodes.log file that is used to enforce the dependencies of the DAG. The DAG can then continue towards completion.
Recovery is different than a Rescue DAG. Recovery is appropriate when no Rescue DAG has been created. There will be no Rescue DAG if the machine running the condor_dagman job crashes, or if the condor_schedd daemon crashes, or if the condor_dagman job crashes, or if the condor_dagman job is placed on hold.
Much of the time, when a not-completed DAG is re-submitted, it will automatically be placed into recovery mode due to the existence and contents of a lock file created as the DAG is first run. In recovery mode, the .nodes.log is used to identify nodes that have completed and should not be re-submitted.
DAGMan can be told to work in recovery mode by including the -DoRecovery option on the command line, as in the example
condor_submit_dag diamond.dag -DoRecovery
where diamond.dag is the name of the DAG input file.
When debugging a DAG in which something has gone wrong, a first determination is whether a resubmission will use a Rescue DAG or benefit from recovery. The existence of a Rescue DAG means that recovery would be inappropriate. A Rescue DAG is has a file name ending in .rescue<XXX>, where <XXX> is replaced by a 3-digit number.
Determine if a DAG ever completed (independent of whether it was successful or not) by looking at the last lines of the .dagman.out file. If there is a line similar to
(condor_DAGMAN) pid 445 EXITING WITH STATUS 0then the DAG completed. This line explains that the condor_dagman job finished normally. If there is no line similar to this at the end of the .dagman.out file, and output from condor_q shows that the condor_dagman job for the DAG being debugged is not in the queue, then recovery is indicated.
It can be helpful to see a picture of a DAG. DAGMan can assist you in visualizing a DAG by creating the input files used by the AT&T Research Labs graphviz package. dot is a program within this package, available from http://www.graphviz.org/, and it is used to draw pictures of DAGs.
DAGMan produces one or more dot files as the result of an extra line in a DAG input file. The line appears as
DOT dag.dot
This creates a file called dag.dot. which contains a specification of the DAG before any jobs within the DAG are submitted to HTCondor. The dag.dot file is used to create a visualization of the DAG by using this file as input to dot. This example creates a Postscript file, with a visualization of the DAG:
dot -Tps dag.dot -o dag.ps
Within the DAG input file, the DOT command can take several optional parameters:
DOT dag.dot DONT-OVERWRITE
causes files
dag.dot.0,
dag.dot.1,
dag.dot.2,
etc. to be created.
This option is
most useful when combined with the UPDATE option to
visualize the history of the DAG after it has finished executing.
label=.
This may be useful if further editing of the created files would
be necessary,
perhaps because you are automatically visualizing the DAG as it
progresses.
If conflicting parameters are used in a DOT command, the last one listed is used.
DAGMan can capture the status of the overall DAG and all DAG nodes in a node status file, such that the user or a script can monitor this status. This file is periodically rewritten while the DAG runs. To enable this feature, the DAG input file must contain a line with the NODE_STATUS_FILE command.
The syntax for a NODE_STATUS_FILE command is
NODE_STATUS_FILE statusFileName [minimumUpdateTime] [ALWAYS-UPDATE]
The status file is written on the machine on which the DAG is submitted; its location is given by statusFileName, and it may be a full path and file name.
The optional minimumUpdateTime specifies the minimum number of seconds that must elapse between updates to the node status file. This setting exists to avoid having DAGMan spend too much time writing the node status file for very large DAGs. If no value is specified, this value defaults to 60 seconds (as of version 8.5.8; previously, it defaulted to 0). The node status file can be updated at most once per DAGMAN_USER_LOG_SCAN_INTERVAL, as defined at section 3.5.23, no matter how small the minimumUpdateTime value. Also, the node status file will be updated when the DAG finishes, whether successfully or not, even if minimumUpdateTime seconds have not elapsed since the last update.
Normally, the node status file is only updated if the status of some nodes has changed since the last time the file was written. However, the optional ALWAYS-UPDATE keyword specifies that the node status file should be updated every time the minimum update time (and DAGMAN_USER_LOG_SCAN_INTERVAL), has passed, even if no nodes have changed status since the last time the file was updated. (The file will change slightly, because timestamps will be updated.) For performance reasons, large DAGs with approximately 10,000 or more nodes are poor candidates for using the ALWAYS-UPDATE option.
As an example, if the DAG input file contains the line
NODE_STATUS_FILE my.dag.status 30the file my.dag.status will be rewritten at intervals of 30 seconds or more.
This node status file is overwritten each time it is updated. Therefore, it only holds information about the current status of each node; it does not provide a history of the node status.
NOTE: HTCondor version 8.1.6 changes the format of the node status file.
The node status file is a collection of ClassAds in New ClassAd format. There is one ClassAd for the overall status of the DAG, one ClassAd for the status of each node, and one ClassAd with the time at which the node status file was completed as well as the time of the next update.
Here is an example portion of a node status file:
[
  Type = "DagStatus";
  DagFiles = {
    "job_dagman_node_status.dag"
  };
  Timestamp = 1399674138; /* "Fri May  9 17:22:18 2014" */
  DagStatus = 3; /* "STATUS_SUBMITTED ()" */
  NodesTotal = 12;
  NodesDone = 11;
  NodesPre = 0;
  NodesQueued = 1;
  NodesPost = 0;
  NodesReady = 0;
  NodesUnready = 0;
  NodesFailed = 0;
  JobProcsHeld = 0;
  JobProcsIdle = 1;
]
[
  Type = "NodeStatus";
  Node = "A";
  NodeStatus = 5; /* "STATUS_DONE" */
  StatusDetails = "";
  RetryCount = 0;
  JobProcsQueued = 0;
  JobProcsHeld = 0;
]
...
[
  Type = "NodeStatus";
  Node = "C";
  NodeStatus = 3; /* "STATUS_SUBMITTED" */
  StatusDetails = "idle";
  RetryCount = 0;
  JobProcsQueued = 1;
  JobProcsHeld = 0;
]
[
  Type = "StatusEnd";
  EndTime = 1399674138; /* "Fri May  9 17:22:18 2014" */
  NextUpdate = 1399674141; /* "Fri May  9 17:22:21 2014" */
]
Possible DagStatus and NodeStatus attribute values are:
STATUS_NOT_READY): At least one parent has not yet finished
or the node is a FINAL node.
STATUS_READY): All parents have finished, but the node is not
yet running.
STATUS_PRERUN): The node's PRE script is running.
STATUS_SUBMITTED): The node's HTCondor job(s) are in
the queue.
STATUS_POSTRUN): The node's POST script is running.
STATUS_DONE): The node has completed successfully.
STATUS_ERROR): The node has failed.
A NODE_STATUS_FILE command inside any splice is ignored. If multiple DAG files are specified on the condor_submit_dag command line, and more than one specifies a node status file, the first specification takes precedence.
DAGMan can produce a machine-readable history of events. The jobstate.log file is designed for use by the Pegasus Workflow Management System, which operates as a layer on top of DAGMan. Pegasus uses the jobstate.log file to monitor the state of a workflow. The jobstate.log file can used by any automated tool for the monitoring of workflows.
DAGMan produces this file when the command JOBSTATE_LOG is in the DAG input file. The syntax for JOBSTATE_LOG is
JOBSTATE_LOG JobstateLogFileName
No more than one jobstate.log file can be created by a single instance of condor_dagman. If more than one jobstate.log file is specified, the first file name specified will take effect, and a warning will be printed in the dagman.out file when subsequent JOBSTATE_LOG specifications are parsed. Multiple specifications may exist in the same DAG file, within splices, or within multiple, independent DAGs run with a single condor_dagman instance.
The jobstate.log file can be considered a filtered version of the dagman.out file, in a machine-readable format. It contains the actual node job events that from condor_dagman, plus some additional meta-events.
The jobstate.log file is different from the node status file, in that the jobstate.log file is appended to, rather than being overwritten as the DAG runs. Therefore, it contains a history of the DAG, rather than a snapshot of the current state of the DAG.
There are 5 line types in the jobstate.log file. Each line begins with a Unix timestamp in the form of seconds since the Epoch. Fields within each line are separated by a single space character.
timestamp INTERNAL *** DAGMAN_STARTED dagmanCondorID ***
The dagmanCondorID field is the condor_dagman job's ClusterId attribute, a period, and the ProcId attribute.
timestamp INTERNAL *** DAGMAN_FINISHED exitCode ***
The exitCode field is value the condor_dagman job returns upon exit.
timestamp INTERNAL *** RECOVERY_STARTED ***
The formatting of the line is
timestamp INTERNAL *** RECOVERY_FINISHED ***
or
timestamp INTERNAL *** RECOVERY_FAILURE ***
timestamp JobName eventName condorID jobTag - sequenceNumber
The JobName is the name given to the node job as defined in the DAG input file with the command JOB. It identifies the node within the DAG.
The eventName is one of the many defined event or meta-events given in the lists below.
The condorID field is the job's ClusterId attribute, a period, and the ProcId attribute. There is no condorID assigned yet for some meta-events, such as PRE_SCRIPT_STARTED. For these, the dash character ('-') is printed.
The jobTag field is defined for the Pegasus workflow manager. Its usage is generalized to be useful to other workflow managers. Pegasus-managed jobs add a line of the following form to their HTCondor submit description file:
+pegasus_site = "local"This defines the string local as the jobTag field.
Generalized usage adds a set of 2 commands to the HTCondor submit description file to define a string as the jobTag field:
+job_tag_name = "+job_tag_value"
+job_tag_value = "viz"
This defines the string viz as the jobTag field. Without any of these added lines within the HTCondor submit description file, the dash character ('-') is printed for the jobTag field.
The sequenceNumber is a monotonically-increasing number that starts at one. It is associated with each attempt at running a node. If a node is retried, it gets a new sequence number; a submit failure does not result in a new sequence number. When a Rescue DAG is run, the sequence numbers pick up from where they left off within the previous attempt at running the DAG. Note that this only applies if the Rescue DAG is run automatically or with the -dorescuefrom command-line option.
Here is an example of a very simple Pegasus jobstate.log file, assuming the example jobTag field of local:
1292620511 INTERNAL *** DAGMAN_STARTED 4972.0 ***
1292620523 NodeA PRE_SCRIPT_STARTED - local - 1
1292620523 NodeA PRE_SCRIPT_SUCCESS - local - 1
1292620525 NodeA SUBMIT 4973.0 local - 1
1292620525 NodeA EXECUTE 4973.0 local - 1
1292620526 NodeA JOB_TERMINATED 4973.0 local - 1
1292620526 NodeA JOB_SUCCESS 0 local - 1
1292620526 NodeA POST_SCRIPT_STARTED 4973.0 local - 1
1292620531 NodeA POST_SCRIPT_TERMINATED 4973.0 local - 1
1292620531 NodeA POST_SCRIPT_SUCCESS 4973.0 local - 1
1292620535 INTERNAL *** DAGMAN_FINISHED 0 ***
The condor_dagman job places information about the status of the DAG into its own job ClassAd. The attributes are fully described at section 13. The attributes are
Note that most of this information is also available in the dagman.out file as described in section 2.10.7.
Using DAGMan is recommended when submitting large numbers of jobs. The recommendation holds whether the jobs are represented by a DAG due to dependencies, or all the jobs are independent of each other, such as they might be in a parameter sweep. DAGMan offers:
Each of these capabilities is described in detail within this manual section about DAGMan. To make effective use of DAGMan, there is no way around reading the appropriate subsections.
To run DAGMan with large numbers of independent jobs, there are generally two ways of organizing and specifying the files that control the jobs. Both ways presume that programs or scripts will generate needed files, because the file contents are either large and repetitive, or because there are a large number of similar files to be generated representing the large numbers of jobs. The two file types needed are the DAG input file and the submit description file(s) for the HTCondor jobs represented. Each of the two ways is presented separately:
  # file sweep.dag
  JOB job0 job0.submit
  JOB job1 job1.submit
  JOB job2 job2.submit
  .
  .
  .
  JOB job999 job999.submit
There are 1000 submit description files, with a unique one for each of the job<N> jobs. Assuming that all files associated with this set of jobs are in the same directory, and that files continue the same naming and numbering scheme, the submit description file for job6.submit might appear as
  # file job6.submit
  universe = vanilla
  executable = /path/to/executable
  log = job6.log
  input = job6.in
  output = job6.out
  arguments = "-file job6.out"
  queue
Submission of the entire set of jobs uses the command line
condor_submit_dag sweep.dag
A benefit to having unique submit description files for each of the jobs is that they are available if one of the jobs needs to be submitted individually. A drawback to having unique submit description files for each of the jobs is that there are lots of submit description files.
  # file sweep.dag
  JOB job0 common.submit
  VARS job0 runnumber="0"
  JOB job1 common.submit
  VARS job1 runnumber="1"
  JOB job2 common.submit
  VARS job2 runnumber="2"
  .
  .
  .
  JOB job999 common.submit
  VARS job999 runnumber="999"
The single submit description file for all these jobs utilizes the runnumber variable value in its identification of the job's files. This submit description file might appear as
  # file common.submit
  universe = vanilla
  executable = /path/to/executable
  log = wholeDAG.log
  input = job$(runnumber).in
  output = job$(runnumber).out
  arguments = "-$(runnumber)"
  queue
The job with runnumber="8" expects to find its input file job8.in in the single, common directory, and it sends its output to job8.out. The single log for all job events of the entire DAG is wholeDAG.log. Using one file for the entire DAG meets the limitation that no macro substitution may be specified for the job log file, and it is likely more efficient as well. This node's executable is invoked with
/path/to/executable -8
These examples work well with respect to file naming and file location when there are less than several thousand jobs submitted as part of a DAG. The large numbers of files per directory becomes an issue when there are greater than several thousand jobs submitted as part of a DAG. In this case, consider a more hierarchical structure for the files instead of a single directory. Introduce a separate directory for each run. For example, if there were 10,000 jobs, there would be 10,000 directories, one for each of these jobs. The directories are presumed to be generated and populated by programs or scripts that, like the previous examples, utilize a run number. Each of these directories named utilizing the run number will be used for the input, output, and log files for one of the many jobs.
As an example, for this set of 10,000 jobs and directories, assume that there is a run number of 600. The directory will be named dir600, and it will hold the 3 files called in, out, and log, representing the input, output, and HTCondor job log files associated with run number 600.
The DAG input file sets a variable representing the run number, as in the previous example:
  # file biggersweep.dag
  JOB job0 bigger.submit
  VARS job0 runnumber="0"
  JOB job1 bigger.submit
  VARS job1 runnumber="1"
  JOB job2 bigger.submit
  VARS job2 runnumber="2"
  .
  .
  .
  JOB job9999 bigger.submit
  VARS job9999 runnumber="9999"
A single HTCondor submit description file may be written. It resides in the same directory as the DAG input file.
  # file bigger.submit
  universe = vanilla
  executable = /path/to/executable
  log = log
  input = in
  output = out
  arguments = "-$(runnumber)"
  initialdir = dir$(runnumber)
  queue
One item to care about with this set up is the underlying file system for the pool. The transfer of files (or not) when using initialdir differs based upon the job universe and whether or not there is a shared file system. See section 12 for the details on the submit command initialdir.
Submission of this set of jobs is no different than the previous examples. With the current working directory the same as the one containing the submit description file, the DAG input file, and the subdirectories,
condor_submit_dag biggersweep.dag
condor_dagman may report workflow metrics to one or more HTTP servers. This capability is currently only used for workflows run under Pegasus. The reporting is disabled by setting the CONDOR_DEVELOPERS configuration variable to NONE, or by setting the PEGASUS_METRICS environment variable to any value other than True (case-insensitive) or 1. The dagman.out file will indicate whether or not metrics were reported.
For every DAG, a metrics file is created independent of the reporting of those metrics. This metrics file is named <dag_file_name>.metrics, where <dag_file_name> is the name of the DAG input file. In a workflow with nested DAGs, each nested DAG will create its own metrics file.
Here is an example metrics output file:
{
    "client":"condor_dagman",
    "version":"8.1.0",
    "planner":"/lfs1/devel/Pegasus/pegasus/bin/pegasus-plan",
    "planner_version":"4.3.0cvs",
    "type":"metrics",
    "wf_uuid":"htcondor-test-job_dagman_metrics-A-subdag",
    "root_wf_uuid":"htcondor-test-job_dagman_metrics-A",
    "start_time":1375313459.603,
    "end_time":1375313491.498,
    "duration":31.895,
    "exitcode":1,
    "dagman_id":"26",
    "parent_dagman_id":"11",
    "rescue_dag_number":0,
    "jobs":4,
    "jobs_failed":1,
    "jobs_succeeded":3,
    "dag_jobs":0,
    "dag_jobs_failed":0,
    "dag_jobs_succeeded":0,
    "total_jobs":4,
    "total_jobs_run":4,
    "total_job_time":0.000,
    "dag_status":2
}
Here is an explanation of each of the items in the file:
The braindump.txt file is generated by pegasus-plan; the name of the braindump.txt file is specified with the PEGASUS_BRAINDUMP_FILE environment variable. If not specified, the file name defaults to braindump.txt, and it is placed in the current directory.
Note that the total_job_time value is always zero, because the calculation of that value has not yet been implemented.
If a DAG succeeds, but the metrics reporting fails, the DAG is still considered successful.
The metrics are reported only at the end of a DAG run. This includes reporting the metrics if the condor_dagman job is removed, or if the DAG drains from the queue because of being halted by a halt file.
The metrics are reported by the
condor_dagman_metrics_reporter executable
as described in the manual page at
.
As of version 8.5.6, condor_dagman propagates accounting_group and accounting_group_user values specified for condor_dagman itself to all jobs within the DAG (including sub-DAGs).
The accounting_group and accounting_group_user values can be specified using the -append flag to condor_submit_dag, for example:
condor_submit_dag -append accounting_group=group_physics -append accounting_group_user=albert relativity.dag
See section 3.6.7 for a discussion of group accounting and section 3.6.8 for a discussion of accounting groups with hierarchical group quotas.