CS838 - Project 2 - Motion Capture

Students Involved: (But not with eachother)
Alex Mohr (amohr@cs.wisc.edu)
Christopher Herrman (herrman@cs.wisc.edu)
The goods:
Our source is here.
An executable is here.
Some sample motions:
A motion of someone getting shot: Shot_Head1.bvh
I think this person drank a bit too much: DrunkFall2.bvh
My own personal favorite: DncModrn.bvh
Reading motion capture data:
Our program is able to read in BVH files. Time was taken to write a file parser that
was completely general, and we have not been able to find a file that it didn't work on.
Euler rotations can be in any order. Internally, we take the euler angle and convert it to a
quaternion which is always used in drawing. Also, there are no end of line problems encountered
with our data parser.
Displaying the data:
Our interface for displaying the data is fairly straight forward. There are two options
provided in the manipulate menu. The first, and default, is to manipulate the camera position.
To orbit the camera around the viewpoint, click the left mouse button and drag, Camera motion
exhibits no problems with gimbal lock. To zoom in and out, simply click the right mouse button
and move the mouse left and right. The second manipulation option moves the groundplain up and
down for data with ground not at 0.
To load motion capture data, select open from the file menu and find the file that you
would like to open. After a motion is loaded, playback is controled from the arrow buttons at
the top of the window. From left to right, the buttons have the following actions:
Set the current frame to the beginning of the animation.
Go back one frame in the animation.
 Play the animation / Pause the animation.
Go forward one frame in the animation.
Set the current frame to the end of the animation.
After you have opened a file, there is the option of outputting marker data as specified in the
project specification. This is done by selecting Marker export from the file menu. This displays
a file chooser where you should select the marker data file. The output is then generated and written
to the file mocap.out in the current working directory.
Interpolation Control:
 Next to the arrow controls, there is a bar that displays the current frame relative to the
beginning and end of the animation. That frame is denoted by a vertical black line that moves
along as the animation plays. This tool can also be used to scrub the animation simply by
left clicking and draging through frames. The frame bar also provides an interface to the
interpolation functionality of the program. By right-clicking on the bar, you will set the
frame that you would like to end interpolation on. This bar is made red for easy reference.
Then, to set the beginning frame for interpolation, right click on the left side of the bar and
drag to the desired frame. This frame is marked with a blue line. At this point, you have set
up what frames you would like to interpolate rotations between, but have not actually told the
program to perform the interpolation. Access to this functionality is provided under
the Drawing Options menu. When the interpolation toggle is enabled, a yellow bar is drawn from
the beginning of the interpolation frame to the end. Display of the character changes when
the current frame is within this range. First, if extremity trails are enabled, they are not
drawn. This is because at load time, we compute the end effector positions once and store them
for efficiency. When interpolating, these end effector positions are no longer valid, and
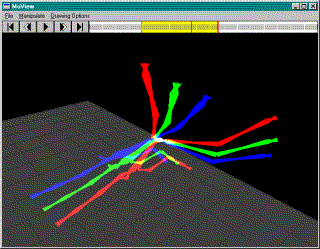
therefore aren't drawn. The next major change you will see is that the skeleto is now drawn
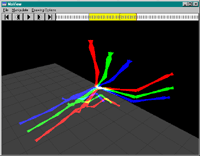
three times, each time representing a different angle interpolation method. The red skeleton
represents the interpolations based upon Euler angles. This interpolation is simply
a standard LERP. The gree skeleton represents quaternion SLERPS. Finally, the blue skeleton
represents the Exponential Map interpolation. Exponential Map interpolation is done by first
converting from quaternions to the exponential map. Then the two exponential maps are LERP-ED,
with the resulting Exponential map converted back to a quaternion for drawing purposes.
General Drawing Options:
 The Drawing Options menu has toggles for various drawing modes in the program.
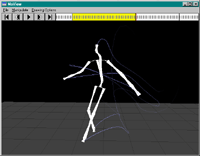
The first of these modes is "Lines" this toggles the drawing of lines to outline the skeleton.
The next option is "Points." Similarly this toggles whether or not there are points drawn at
the joints of the skeleton. "Extremity trails" toggles the drawing of the paths of the
extremitys. The paths are drawn in a light blue and fade out with time. "Bones" toggles the
drawing of four triangles meant to approximate what bones would look like, and to give the
skeleton a little more shape than just drawing lines does. Lastly, under drawing
options there is a menu choice for "Automatic Cinematography." This mode follows
the translations of the root node and smooths them out. There are no jarring camera motions
because of the care taken in smoothing out these translations. Camera translations work well
for even fast moving objects. For more complete information as to how this function works,
please see below.
Bonus information:
We implemented two bonus capabilities. The first being the automatic cinematography, and
secondly the exponential maps for interpolation.
Automatic Cinematography
The idea is to have a camera motion that reacts slowly enough to rapid
changes in motion to ensure smooth motion, but also a camera motion that is
responsive enough to keep the character in frame.
To do this, the root node of the animation is always targeted as the desired
viewpoint. Blindly clamping the viewpoint to the root node certainly kept
the character in frame, but empirical evidence suggests that this makes Alex
nauseated. So he devised a better method. Instead of clamping the
viewpoint directly to the root node, we take small steps that tend toward
the root node.
The size of these steps depends on some things. The current direction of
camera motion is taken into consideration. The idea is to resist steps that
are dramatically opposed to the current direction of motion while to
encourage steps that are well aligned with the direction of motion. In
addition to this, an asymptotic slowdown is used as the viewpoint approaches
the root node. The combination of these two things makes for quite pleasant camera motions and transitions from frame to frame.
Exponential Maps
The exponential map that we implemented is basically the same as what Grassia outlined in his
paper. The interpolation process proceeds in the following manner: First we convert from quaternion
to exponential map, then LERP the two exponential maps and convert back to a quaternion. In some
cases, this doesn't quite yield the proper result. This is due to the fact that were not
interpolating to the closest equivalent rotation. Interestingly enough when we tried that we were
not able to get that to work completely right. In most cases however, the exponential map is fairly
close to the result from slerping, and in a lot of cases, substantially better than Euler
Interpolation.
This file was last modified on 4/18/2000 at 1:00pm.


Play the animation / Pause the animation.
 Next to the arrow controls, there is a bar that displays the current frame relative to the
beginning and end of the animation. That frame is denoted by a vertical black line that moves
along as the animation plays. This tool can also be used to scrub the animation simply by
left clicking and draging through frames. The frame bar also provides an interface to the
interpolation functionality of the program. By right-clicking on the bar, you will set the
frame that you would like to end interpolation on. This bar is made red for easy reference.
Then, to set the beginning frame for interpolation, right click on the left side of the bar and
drag to the desired frame. This frame is marked with a blue line. At this point, you have set
up what frames you would like to interpolate rotations between, but have not actually told the
program to perform the interpolation. Access to this functionality is provided under
the Drawing Options menu. When the interpolation toggle is enabled, a yellow bar is drawn from
the beginning of the interpolation frame to the end. Display of the character changes when
the current frame is within this range. First, if extremity trails are enabled, they are not
drawn. This is because at load time, we compute the end effector positions once and store them
for efficiency. When interpolating, these end effector positions are no longer valid, and
therefore aren't drawn. The next major change you will see is that the skeleto is now drawn
three times, each time representing a different angle interpolation method. The red skeleton
represents the interpolations based upon Euler angles. This interpolation is simply
a standard LERP. The gree skeleton represents quaternion SLERPS. Finally, the blue skeleton
represents the Exponential Map interpolation. Exponential Map interpolation is done by first
converting from quaternions to the exponential map. Then the two exponential maps are LERP-ED,
with the resulting Exponential map converted back to a quaternion for drawing purposes.
 The Drawing Options menu has toggles for various drawing modes in the program.
The first of these modes is "Lines" this toggles the drawing of lines to outline the skeleton.
The next option is "Points." Similarly this toggles whether or not there are points drawn at
the joints of the skeleton. "Extremity trails" toggles the drawing of the paths of the
extremitys. The paths are drawn in a light blue and fade out with time. "Bones" toggles the
drawing of four triangles meant to approximate what bones would look like, and to give the
skeleton a little more shape than just drawing lines does. Lastly, under drawing
options there is a menu choice for "Automatic Cinematography." This mode follows
the translations of the root node and smooths them out. There are no jarring camera motions
because of the care taken in smoothing out these translations. Camera translations work well
for even fast moving objects. For more complete information as to how this function works,
please see below.