- A brightness value at each pixel
- The geometry at each pixel
- The u and v values of the surface if it is intersected.
- The direction of the U and V vectors of the surface (More on this in a bit)
For the first image its:
- Pick a point randomly from the screen to start a line.
- Check to see if this point intersects an object, if not goto 1.
- Check to see if this area needs to be darkened. If not, goto 1.
- Start drawing a line following the U vector. Start in one direction, then when no more points can be added, go in the other.
- Save this vector (the x,y location of the screen, the u,v location of the object, and the random noise offsets).
- Goto 1 until no more lines can be added.
- Draw the outline.
- Save the frame, increment the frame counter, and go to the #1 below.
So for the rest of the images its:
- Try adding all the last successful lines from the last frame, doing some searching to see if they moved.
- Store any lines that succeed.
- Pick a point randomly from the screen to start a line.
- Check to see if this point intersects an object, if not goto 3.
- Check to see if this area needs to be darkened. If not, goto 3.
- Start drawing a line following the U vector. Start in one direction, then when no more points can be added, go in the other.
- Save this line (the x,y location of the screen, the u,v location of the object, and the random noise offsets).
- Goto 3 until no more lines can be added.
- Draw the outlines.
- Save the frame, increment the frame counter, and goto 1.
So whats this about noise? Yes, I have also implemented a 3 dimensional Perlin noise field to give the lines a little inherant wiggle. The third dimension is time. This makes the images imperfect (and thats the point). For the examples I used, I am using 5 octaves and each successive octave is 1/1.4th as much as the one before it. I have a nifty C++ object that handles all of that for me now. For speed (and since it really isn't doing a lot), I only implemented linear interpretation.
When each line is drawn, it is given a random offest into the noise field on this frame's offset into the noise field. All the points that are drawn get their noise from that offset. However, because the noise causes many artifacts when the noisy lines are used in the shading calculations, I actually store 2 copies of the picture in memory, one thats noisy and one that is not.
I got around this by doing everything as float offsets rather than integer. When I go to draw a frame, I have methods that will take floats and preform the necessary linear interpolation to get the right value. With all the samples you see, I have not done any supersampling, and everything has been done at the resolution you see.
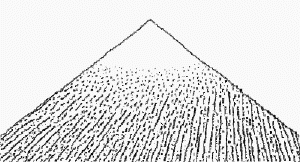 wiggle.avi - 3.9 meg | This animation is one triangle that remains stationary to show off the Perlin Noise. |
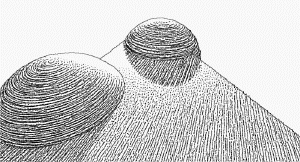 eggbeat.avi - 12 meg | This animation is two spheres that move in an eggbeater pattern. |
 cool-1.avi (lower resolution) - 2.1 meg | This was the final animation I created with my project. It contains a sphere and a pyramid that go around on a triangle (the triangle is to show shadows). |
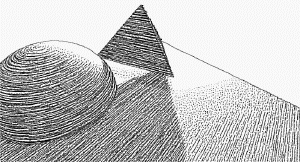 cool-1big.avi (higher resolution) - 15.5 meg | This is the same thing as the one above. |